The Crucifixion
Art Workshop
Summary of Lesson Activities:
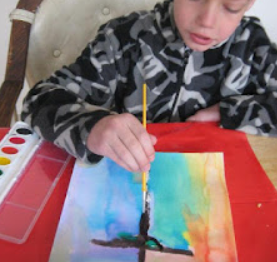
 In this workshop, the students will view and discuss many different images of Jesus’ crucifixion and will create their own painting Christ's crucifixion -- and paint themselves into the scene.
Scripture Reference:
Mark 15:1-47
Leader Preparation:
- Review the scripture
- Gather the Materials
- This lesson requires that you familiarize yourself with the different styles and symbols found in Crucifixion art and print some examples. The internet will be your friend here! The original author of this lesson used a book that featured religious artwork of the Crucifixion. You may find something of the sort at your local library or church library.
Setting up the stations:
You will move with your students to three stations. This is needed so that they don't become distracted by the art supplies which need to be put out ahead of time (so you will place them at the third station).
Station 1, Research Station: The Bibles and crucifixion art should be on a separate table used only for discussion.
Station 2, Materials: The wood (or paper) of various shapes and sizes should be easily accessible, so that the students may choose their own when they are ready to begin painting. (Note: The crackle coat will have been pre-applied to the wood surfaces, so that it has enough time to dry.)
Station 3, The Work Area: Before the students arrive, the paint, palettes, water, and brushes should be placed around the work table. In order to save time (and paint), it might be a good idea to go ahead and squirt a small amount of each available color onto each of the students’ palettes.
Materials List:
- The book: Crucifixion compiled by Phaidon (or similar book or internet collected group of Cross artwork)
- Bibles
- Various crucifixion images
- Acrylic paint or watercolor (or both!)
- Pencils for sketching
- Watercolor/artist's paper for their painting.
- Paint brushes
- Paper plates or palettes
- Cups or jars of water.
Lesson Plan
Opening:
Greet the children and Introduce yourself.
Open with a prayer.
Dig:
Begin this brief discussion at the “Research Station.” Read or have the children read aloud Mark 15:1-47. Because some of the terms and concepts in this passage may be unfamiliar to the students, you may wish to retell the story in your own words and answer any questions the students may have before moving on to the second passage, Philippians 2:5-11.
Discuss the following questions with the students:
- With what crime was Jesus charged?
(Pilate called Jesus “The King of the Jews” and declared that the claims of miracles made by Jesus’ followers were lies.) - What does the word “crucifixion” mean?
(According to Encarta Desktop Encyclopedia, crucifixion refers to the execution of a criminal by nailing or binding to a cross. It was a common form of capital punishment from the 6th century BCE to the 4th century CE. The Roman practice of crucifixion was abolished in 337 by Constantine the Great out of respect for Jesus Christ.)
Explain to the students that they are going to be looking at many different artists’ interpretations of Jesus’ crucifixion, spanning many times and cultures. Within each example are numerous symbols, techniques, characters, and emotions. Through looking closely at these images, the students will gain an understanding of the act of crucifixion as well as the impact Jesus’ crucifixion has had on the art world. (As the students are perusing the images, point out certain symbols seen in some of the images.
Note the choices of colors and shapes and what meaning/feeling they convey.
Ask the children to consider what is most important to them in the story of Jesus’ crucifixion and suggest that they focus on that concept in their paintings. The students may use a painting as inspiration for a design of their own. Give the students a moment to select the crucifixion image that most interests them, and then quickly get them settled with their supplies. Each student will select a piece of wood (or paper) from the “Materials Station” that meets their particular needs. They will bring the images and surfaces that they have selected over to the “Work Area” and begin their own interpretations of Jesus’ crucifixion.
 Suggest that the paint THEMSELVES into their cross painting. What would they be doing and thinking (posing like, looking like) at the foot of Jesus' cross? What colors (mood) would they paint themselves with?
It will help them a lot if they first SKETCH in PENCIL the main objects/persons/shapes they plan on putting in their painting. Invite them to do it on scrap paper first. As they do this, circulate and offer suggestions and encouragement. Once their test sketch is to their satisfaction, have them sketch it again on the watercolor/artist's paper that they will now paint.
Remind them and demonstrate with a brush how colors and brush strokes can help tell the story and emotion of a story or express their own feelings. Offer examples and demonstrate. Talk to them about whether they may want to be more realistic or "impressionistic", more symbolic or more real life.
Suggest that they do not have to paint the whole scene. They could, for example, paint Christ's face, or his hands, or the reaction of his mother, or several reactions. Draw a few examples of this. They may also wish to focus on the surrounding ground and sky -- its colors and shapes, to convey the sense of darkness and hope in the event.
Help the students mix colors, if necessary. Encourage those who paint more slowly, so that they have the opportunity to finish their masterpieces. Those who paint quickly can be encouraged to add more detail or address certain aspects of the story that may not have been illustrated in the particular example they chose. All students should be encouraged to work neatly and creatively. There are no “wrong answers” in art!
You may wish to play some music softly in the background to help set the mood. Keep in mind that some volumes and styles of music can produce anxiety.
Reflection:
Be sure the students all sign their paintings, then display their panels on the rail. Ask the students to explain why they chose the image they chose to copy or why they chose the image they designed. Discuss the use of color, line, perspective, etc. Finally, remind the students that when they get to take their panels home, they will have their own relic, which will always remind them that Jesus died for us, so that we may be forgiven for our sins. Because Jesus was crucified, we have no cross to bear.
Say a prayer of your own to close the workshop, or use the following:
Dear God, thank you for sending your son Jesus to walk this earth, to teach us, and to die for us. Thank you for your unending love and forgiveness. Please help us recognize your glory and to demonstrate your love each day. In Jesus’ name, we pray. Amen.
Adjustments for younger/older children:
Many of the images may be overly graphic for younger students. Use your own discretion. It is important, however, that the pain, violence, and suffering Jesus endured not be overlooked or eliminated in this study.
Some possible art references:
- Bosch: The Complete Paintings, by Walter Bosing.
- Art Across Time: Volumes I and II, by Laurie Schneider Adams.
- Crucifixion, compiled by Phaidon Press.
A lesson written by Jan Marshall from: Brenthaven Cumberland Presbyterian Church
Brentwood, TN, and members of the Rotation.org Content Team


