Making Simple Fir Trees
I'm sure everyone has made these, so the only reason I'm posting is my solution to how I added handles to the back.
The one pictured was made by a gentleman at Janice's church and had a wooden 2x4 back and base, so it was self-standing. But you can see (in the picture to your right) how nice the neon green Bristol board sheets look under black light.
For this year's skit (not black light) I needed  two tall simple Fir trees and decided to make them dual purpose by using the neon green Bristol board sheets.
Supplies:
- Green Bristol Board Sheets (number will depend on size of trees) ours were tall, so we used 4 sheets per tree.
- Cardboard (cardboard fridge box or foam board)
- Wide Tongue Depressors (if piecing cardboard or foam board together)
- 2 small or medium sized gift bags (from your home wrapping supplies) with those strong twisted paper handles
- dowel rod or yard stick
- duck tape
- marker
- scissors
- glue gun
Directions:
- Lay your green sheets together, making a butt joint on the widest side (make sure the sides with price bar is face-up), then duct tape over your seam.
- Now draw on this same back side your tree shape (pattern), so your marks don't show on the good side, then cut out.

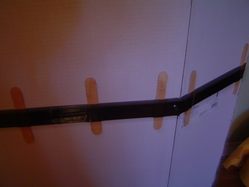
- So it will stand straight: use a piece of cardboard the height of your tree (or piece together cardboard or foam board using the butt joint, then glue on wide tongue depressors across your seam to reinforce it, then duct tape across seam and over tongue depressors, sample pictured.)
- Lay down your cut tree on your cardboard. With a marker mark a dot at the inside branch indents. Removed the tree then using a yard stick or dowel rod draw a line inside the marks on the fridge box. Then cut out the triangle like shape with a Utility Knife.
- Glue your tree to the cardboard, centering the cardboard inside the tree so it can't been seen from the good side.

- Now take your gift bags, and cut out the handle section from both sides of the bag (see in photo yellow area to cut out of side of bag. Then glue this section to the back of your tree as pictured. One handle facing down, the other facing up.
The trees were light and the handles easy for kids or adults to move or hold upright. It also allowed for them to be stored, packed flat, should you have room to keep them for another time.


