This topic is for posting your Art Workshop lessons and ideas for teaching about the Fiery Furnace.
Check out Jaymie's "melted crayon furnace" project below!

We are an online community of Sunday School teachers, Christian educators, and pastors creating, collecting, and sharing free and premium Sunday School lesson plans, creative ideas, and discussion. We are also the official website of the Workshop Rotation Model (The "WoRM"), a creative way to organize and teach Sunday School. Visit our Bible story lesson forums. View our creative Writing Team Lesson Sets. Explore our 24 downloadable Bible story software programs. Get a free Registered Membership or become a Supporting Member for full access to all site resources. Learn more about our volunteer-led, ecumenical, non-profit, ad-free resource ministry!
This topic is for posting your Art Workshop lessons and ideas for teaching about the Fiery Furnace.
Check out Jaymie's "melted crayon furnace" project below!

Replies sorted oldest to newest
Shadrach, Meshach, Abednego
Art Workshop
Summary of Lesson Activities:
Project: Shrinky Dinks - (Daniel 3)
Shrinky dinks are a drawing kit you put in the oven and they 'shrink" but their image is preserved as a nice art object which can be hung in sunlight. Did Shadrah, Meshach and Abednego "melt" for lack of faith? No!
Leader Preparation:
Supplies List:
Presentation
Opening-Welcome and Lesson Introduction:
Greet the children and introduce yourself.
Open with a prayer.
Dig-Main Content and Reflection:
Read: The Bible story
Practice: The memory verse
Directions:
Discussion: (To be used while they are coloring)
Have the kids work on a Maze or Word Search while waiting their turn in the kitchen.
Closing:
End with a prayer.
Resources:
A lesson posted by Rachel Haugland from: Elim Lutheran Church
Randall, IA
A representative of Rotation.org reformatted this post to improve readability.
Flaming Votive Holders
-- Posted by Heidi
Note: moderator suggests - use battery operated TEA LIGHTS for all ages!
This craft may take some prep but it's fun.
TIP: The larger the 'cup' size for your candle holder, the EASIER it is for your kids to design on the cup surface with tissue paper. Suggested minimum: 4" high by 3" wide. A large clear plastic cup works well.
SUGGESTION
Use two cups.
CUT one of the cups about 1/2" up from the bottom so that it can fit over a second cup and act as a "sleeve" which can be rotated. Now Paste your flames on the inside of the inner cup, and Paste your characters on the outside of the sleeve. This allows your students to TURN the outer sleeve against the flame background. When the tealight is placed inside the inner cup it is a very nice effect.
Materials:
Preparations:
Instructions:
Adaption Suggestions
-- CROSS
- cut the shape of the cross out of light colored construction paper and glue that onto the jar first, then glue several layers of torn tissue paper (red, yellow, orange) over the whole jar.
- I made the 'point' of the tissue paper go up, so as to look like a flame.
- When the votive is dry, you cannot see the cross, but once you light the tea-light, it is in plain view!
 in and out).
When the candle is lit in a darkened room the four men and words show clearly.
Have them share the story of the fiery furnace with friends and family using their art project as a story prop.
Photo of two Fiery Furnace's made by our kids.

1) Originally posted by member Loren
Art Idea - Picture in Frame with Wax Paper/Crayon Melt (Glass)
For the story of Shadrach, Meshach and Abednego in the fiery furnace I used the following craft, and each age group loved it. The 4th and 5th graders thought it was very cool.
2) Originally posted by member Rotation Friend
Shadrach, Meshach, and Abednego: Prayer is Powerful
Art Workshop
Summary of Lesson Activities:
Making Prayer Jars.
Leader Preparation:
Supplies List:
Presentation
Opening-Welcome and Lesson Introduction:
Shepherds will begin by gathering everyone, starting conversation.
Dig-Main Content and Reflection:
Storytelling
The kids might remember that Daniel got thrown in the lions’ den because he wouldn’t pray to King Darius—he prayed to God alone. You can connect it by saying that this was often a problem for the Jewish people. When they were captured by foreign kings, those kings pressured them to give up their religion and pray to different gods. Today’s story and the story of Daniel and the lions’ den were told to help the people remember God and pray to God alone—and to trust God in times of fear.
Read pages 143-144 in The Family Story Bible
Craft:
Explain to the kids that today you’ll be making prayer jars. The idea is that it is important to remember to pray regularly—just like Daniel and Shadrach, Meshach, and Abednego did (remember, the story of Daniel in the lion's den says that Daniel prayed three times a day). One good time to pray is before a meal. Another is before bed.
They’ll be making a jar of prayers to take home. They can decide if they want to make a “before bed” jar or a “before meal” jar. Then, at that time, they can select a prayer from the jar and read it. It’s just one way to remind us to pray to God alone (though there are many others, too, of course!)
Closing:
You can take prayer requests and then close with the regular Indian Paintbrush Lord’s Prayer together (posted on the wall). Tell them that, in addition to all the prayers now in their jars, there’s another important prayer, the Lord’s Prayer. Using it helps us pray in church, and it’s another good prayer to use at home, too.
Author's Note: I really dislike scary bedtime prayers ("Now I Lay Me..." is a classically terrifying prayer that makes God sound like a soul-snatcher (I pray to God my soul to take?!). I tried to find classic prayers (often from saints) that were different and interesting. I did adapt many of them to have more modern and inclusive language. However, you can substitute with any prayers that seem appropriate to your own faith tradition.
Mealtime Prayers:
O God, to those who have hunger, give bread,
and to us who have bread, give the hunger for justice.
Bless this food to our bodies and us to your service.
For food that stills our hunger, for rest that brings us ease,
For homes where memories linger, we give our thanks for these.
God, let us be your hands, your feet, and your heart
to love others in the world.
O Lord my God, teach my heart this day
where and how to find you.
Help me to recognize you, oh God,
in the people around me today.
Christ our God, bless us your servants, our home,
and the food and drink before us, for you are the source
of all blessings, now and forever and ever.
God, thank you for this food before us
and thank you for those who prepared it.
Bedtime Prayers:
Lord God, be a bright flame before me,
a guiding star above me, a smooth path below me,
& a kind shepherd behind me, tonight and forever.
Come, Holy Spirit, and fill the hearts of your people.
Kindle in us the fire of your love.
Lord, the sea is so wide, and my boat is so small.
Be with me.
Now the light has gone away; Jesus, listen while I pray.
Asking you to watch and keep and to send me quiet sleep.
God, we thank you for the night, and for the pleasant morning light;
for rest and food and loving care, and all that makes the world so fair.
Help us to do the things we should, to be to others kind and good,
in all we do at work or play to grow more loving every day.
Now I lay me down to sleep; I pray, oh God, for rest that’s deep.
And in the morning when I wake, help me, God, love’s path to take.
Creator God, please hear my prayer. Keep me in your loving care.
Be my guide in all I do, and bless all those who love me too.
With all that I do and all that I say,
help me to walk in Jesus' way.
State Street UMC G.R.E.A.T. Adventure
Art Workshop
The Fiery Furnace: Shadrach, Meshach and Abednego
Overview of workshop: Children will make melted crayon fiery furnace art.
Note: This activity is based on the melted crayon art that is found all over Pinterest. I wanted something that would look like flames, but would also reflect the heat of the furnace - melted crayons seemed perfect! Almost all the Pinterest examples use a canvas. I didn't have a canvas when I tried this out at home and it worked GREAT on just a piece of white corrugated cardboard. The crayons melted super fast and the melted crayon spread really quickly and really looked like tongues of fire. I tried it out on a canvas board and was disappointed. First it took MUCH longer to melt the crayons (nearly twice as long - which is important when you are trying to have 12 kids do this in about 25 minutes!) and the drips were thinner and didn't spread out "flame-like" as well. I did read where if you prime or paint the canvases, the wax sticks better. It might spread out more as well? (I didn't try it though). Next I tried some mat board that I had left over from another project. It worked better than the canvas, but not as well as the corrugated cardboard. The sample art page is done on cardboard.
Also, I took everyone's advice and used Crayola brand crayons. They worked great. Not sure how the cheaper crayons might work, but I've heard they don't melt as well.
We will have our first session with this project this Sunday and I'm excited about it. I think the kids are really going to enjoy it.
UPDATE!!! AND HOW DID IT GO? with some additional tips if you want to try this...
We had our first session with our older kids (grades 3-5) this past Sunday.
Extra hands:
I recruited an extra adult volunteer to help, in addition to our shepherd and the teacher (me) -- DEFINITELY ask for extra volunteers -- you will need them. We also had some visiting teenagers who did the project too, but were great helpers as well. We assigned two adults to the hot glue table, one to the blow dryer station and the teenagers helped pass out supplies. Once everyone's crayons were glued to the cardboard, all adults helped with the blow dryers.
Prep and Set up:
There is a significant amount of prep to this lesson. Setting up everything into stations beforehand definitely helped. I set up a hot glue station (with several guns), a long table with the boxes and four blow dryers, another table with the broken crayons (separated into bowls according to color and labeled them with how many to take of each). I also decided to pre-cut the figures and the furnace strip, even for the older kids -- and it was a good thing -- we wouldn't have finished otherwise. Put these in a baggie and had each kid choose four figures and put on a small plate. I put old plastic tablecloths on the blow dryer tables and under the floor -- but really the spattering was pretty much limited to inside the boxes. BE SURE your electrical service can handle several blow dryers going at once. (Ask me how I know this...) I thought I had divided up the electrical load, but NOT. We ended up going to different rooms to complete the wax melting process. It was a bit chaotic but it all worked out!
I also decided to go with white corrugated cardboard since it was the fastest medium for melting. We had a small class, but if you have a large class, using cardboard will definitely help speed things along. I found UNWAXED cake sheets that can be cut into the correct size. If I run out of my stash of white cardboard from my garage I plan to use those.
Also, be sure to plug in your glue guns during the Bible study part of the lesson so they are hot and ready to go. Ask me how I know!
The results!
The kids LOVED this. They were all different, but all beautiful! I really think it was a memorable and unique activity. Here are some of our photos...

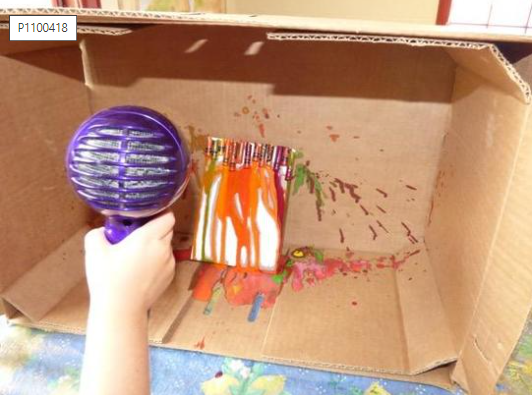
Using the blow dryer to melt the crayons. It took less than 2 minutes to melt. You can see the spatter, pretty much stayed in the box.
 Once cool enough to handle (just takes a few seconds) remove the crayon remnants. If you wait until they have COMPLETELY cooled it's MUCH harder to pull them off. (Ask me how I know...)

FAITH!

HOPE!
Enough with the notes... here's the lesson....
Scripture References: Daniel 3, NIV Adventure Bible, "Courageous Friends” pages 200-203 Deep Blue Bible Storybook.
Memory Verse: "The God we serve is able to save us." Daniel 3:17b
Theme: God calls us to be faithful even when it is not easy. God is with us in difficult times. Christian friends can help us do the right thing.
Supplies - are found below under art activity ~ Fiery Furnace Melted Crayon Art.
Objectives:
Welcome and Introductions
Welcome all children and introduce yourself. Make sure each child is wearing a nametag. Give the children a simple one or two sentence synopsis of what you will be doing during the workshop.
Opening Prayer
Light the Christ Candle and place in the middle of the table where all can see.
Say: We light this candle to remind us that Jesus is the Light of the world. God is with us wherever we go. God is with us here in this place today. Thank you for today and this time we share with You. Help us have open hearts and minds to learn more about you from this story. Amen.
(the candle should remain lit until the end of the session)
Introduce the Story
Say: Our story takes place in Babylon. The King of Babylon was King Nebuchadnezzar and he was very powerful leader of a very powerful empire. King Nebuchadnezzar’s army conquered Israel and took many of the Israelite people to Babylon to live. This was called the Exile. They took the young, intelligent and promising young people first. Three young boys named Shadrach, Meshach and Abednego were captured and carried off to Babylon.
Now Babylon did not worship the one, true God like Shadrach, Meshach and Abednego. In our story we’ll see how that finds them in a big old hot mess of trouble!
There are two words I want you to keep in mind today while we read this story- faith and courage. What do they mean to you? (Write these on the board or print them out on a flip chart)
Faith - A confident belief in the truth. A belief or trust in God. A person with a strong faith in God believes that God is our creator and is always in control.
Courage - A state of mind or spirit that allows one to face danger and overcome fear.
As we read this story, think about how these boys must have felt to be taken far away from their homes and brought to a strange place with different customs and beliefs.
What must it have been like to be in a place that worshiped many different idols?
Bible Study: Grades K-2
Deep Blue Bible Storybook
Since this story took place many years before Jesus was born, where would we find it in the Bible? (Old Testament)
Have the children open their Bibles to “Courageous Friends” on page 200 of the Deep Blue Bible Storybook.
Note the title and the scripture reference (this story comes from the book of Daniel in the Old Testament). Read the story as the children follow along in their Bibles.
Bible Study: Grades 3-5
NIV Adventure Bible
The story we’ll read today took place about 600 years before Jesus was born. Where would we find the book? (Old Testament) Daniel is a book of prophecy.
Have the children open their Bibles to Daniel 3. This is an action-packed story, but long. Use the guide below to shorten the reading slightly. Ask volunteers to read as the other children follow along.
Daniel 3:1 King Nebuchadnezzar builds a statue
Daniel 3:4-6 The commandment to worship the statue
Daniel 3:8-12 Betrayal!
Daniel 3:13-18 Shadrach, Meshach and Abednego before the king
Daniel 3:19-23 Into the fiery furnace
Daniel 3:24-29 Saved!
Discussion
So… let’s talk about those two words -- courage and faith.
Who had courage in our story? (Shadrach, Meshach and Abednego)
How did they show they had courage? (they stook up to the king, did what was right in God’s eyes)
On a scale of 1 to 10, how would you describe their faith? What makes you say that?
Have you ever been asked to do something that you knew was wrong or that you had been told not to do?
Sometimes it’s easier to do those things if “everyone else seems to be doing them, especially if you think the person who gave you the rule isn’t watching. Is it more tempting to do something you shouldn’t if you think you won’t be seen or “caught?”
Think how easy it would have been for the three boys to bow down since everyone else was doing it.
It’s easy to say that we believe in God and that we put God first. The real test is if our actions show it. How did Shadrach, Meshach and Abednego put their faith into action?
What are actions that show that God is first in our lives?
How do YOU show that God is first in your life?
Memory Verse
Help the children locate the memory verse in their Bibles. Review it with them at this time.
"The God we serve is able to save us." Daniel 3:17b
How might this verse strengthen your faith and give you courage when you face something hard?
Sign the Verse
(based on American Sign Language) ASL video dictionary link: http://www.aslpro.com/cgi-bin/aslpro/aslpro.cgi
God – Raise right had above head with palm facing toward you. Bring hand straight down hear side of face.
We – touch right hand to right side of chest, then move in a semi-circle around the left side of chest
Serve – Raise hands palms up and move forward and back twice while looking up toward heaven
Able – make fists with both hands facing down with thumbs sticking out toward center of body. Quickly raise and lower fists (about 12 inches) two times.
Save – cross arms in front of body with fists clenched. Move arms apart until arms are vertical (as if breaking chains)
Us – move right hand in a sweeping circle in front of you from left to right.
Say: We are going to make melted crayon art that will remind us of the story. We read that the furnace was heated seven times hotter than normal. We will use heat to melt crayons to look like flames. We’ll add silhouettes of the men in the furnace and a word from the story or a memory verse label.
For 3-5 graders: Brainstorm some key words from the story and write on the white board before beginning the activity.
Supplies:
Preparation:
Directions:
Discussion
As children work, discuss:
Reflection and Journal Time
Journal Questions:
Grades K-2: Draw a picture of your favorite part of the story.
Grades 3-5: When has God helped you through a difficult time?
Closing Prayer
Gather the children together near the candle. Say: We’re going to close with a “faith and courage” prayer. Think about something in your life that you might need courage to face. Or maybe you need God to strengthen your faith about something.
I will go around the circle. You may pray silently or out loud. Or you may just say the word “courage” or “faith” depending on what your need is.
After our faith and courage prayer, we will close with the Lord’s Prayer. We pray this prayer every week. If you don’t know all the words, pray as much as you can. Over time you will learn it by heart.
This is important prayer time, not play time. This is when we remember that God is with us, just like God was with Shadrach, Meshach and Abednego. No matter what, God is always with us. You may close your eyes or you may look at the flame of the candle. Do not look anywhere else.
Begin the prayer, going around the circle, asking each child for a “faith and courage” prayer. End the circle and pray the Lord’s Prayer together.
Use the candle snuffer to “change the light.”
Say: As we go from here we remember God was with Shadrach, Meshach and Abednego in that fiery furnace and God is with us, too, wherever we go and whatever we do. God strengthens our faith and God gives us courage to do hard things.
Clean up
Gather all supplies and encourage each child to clean his/her own work area.
Dismiss.


Luanne's "Fiery Voltives" photo above reminded me of a fun art project we did back in the early 2000's at my church.
We gave each student a transparency sheet, to which they mod-podged pieces of tissue paper (red, orange, yellow, etc) to create the scene as a work of stained glass. They added "figures" in the furnace. The key is not to use too much mod podge.
Then we had them COVER the mod-podged side of the transparency with ANOTHER transparency, sandwiching the glued tissue in between two dry sheets (making it a lot less messy to take home).
Then we did an exercise where they suggested "slogans" and "encouragements" to the three in the furnace, which they then wrote on the transparency with a permanent sharpie
"God is Cool" was popular.
"Hold on to God when life gets hot"
etc.
 To finish, we hole-punched two 'hanging holes' in the top left and right corners of the transparency, and gave them two suction cup hangers so they could fix their stained glass creation to a window a home.
I wish we'd taken a photo of this project. It was very cool. I found this image online which "sort of" shows you what the finished product looked like minus the hangers and "slogan."


Fiery Furnace "prayer lamps" ...when you need to remember who to call upon!

Two decoupaged plastic cups held together with a pipe-cleaner handle and lit with a tea lamp.
Lamp photo from Ron Shifley's Immanuel Evangelical Church
Read their Sunday School's story here at Rotation.org
Photo from "Meaningful Mama" Bible lessons website.

Decoupaged tissue paper on wax paper attached to "diorama" shoe box and backlit with tea lights. Photo copied with permission. More photos and instructions here.
Access to this requires a Supporting Membership.
If you are not yet a Supporting Member, or if your Supporting Membership has expired, you will see a PURCHASE option below.
Premium "Supporting Member" benefits include:Annual Supporting Memberships are $45. If you would prefer to send a check, or would like to make an additional contribution, look here.

We are a 501(3)c non-profit ministry of sharing supported entirely by individuals and churches.
• IndependentSave