This topic is for posting Art Workshop lessons, ideas and resources for teaching the story of Esther in Sunday School.

In addition to the public lesson and ideas posted below, be sure to check out the Writing Team's "Purim: The Story of Esther" lesson set. It includes detailed Art Workshop and Game Workshop lesson plans (among others) and a special Purim Carnival workshop. Everyone can see the lesson summaries and Bible background. 

Last edited by Neil MacQueen
Original Post

Replies sorted oldest to newest

ARTSY ~ Science-y Idea "For Just Such a TIME As This":


Originally posted by Neil MacQueen in response to a question in the Supporting Member's Lesson Help Lounge....


I was thinking of Mordecai's key line: "Perhaps you have been put here for just such a TIME as this".   And that led me to thinking of this lesson about time and clocks:


Amazon, among other places, sells a $6 quartz clock kit with hour/minute hands that can be mounted onto a thin piece of plexiglass (or a cardboard box) with a clock dial of the kid's own making/drawing. I would have them make one dial with TWO SETS of numbers for the hands to point at: an inner dial with actual Clock Numbers, and on the outside of that dial an Outer dial with words and symbols that the hands could point to.


The question from the story ringing in my ears could be artistically written on the Outer dial face: "What Time Is It?"  "Time to pray", "Time to help", "Time to stand up for what is right."


Think of it as "functional art."  And I really like this idea because it goes home!


Now...here's where the "Science" comes in to make this an Artsy~Science Workshop:


How does the quartz clock mechanism work?
The Quartz crystals in the clock kit "vibrate" in perfect time (frequency) when an electrical charge (battery) is applied to them. An amplifier "listens" to the pulse or "ringing" coming from the crystal. Those pulses are regular without wavering, and thus, they can be counted.


Because the scientists know exactly how many oscillations/vibrations per second, the electronics count them and then move the mechanical gears or electronic lights inside the clock exactly on time. 


This principle of ONE thing vibrating another  --transferring its timing so to speak, could be demonstrated with a tuning fork, which when struck and placed to a glass goblet sets the goblet vibrating, which because of its shape amplifies the sound.  POINT: The Holy Spirit sents us vibrating in tune with God.


This is the same principle in audio speakers and old fashioned record players, --transferring a signal into an electrical impulse which can drive a speaker OR drive a gear on a clock.  It could also be demonstrated with a tin horn or megaphone.... same thing, it amplifies the sound.  You could label that amplifier "Church" or Holy Spirit.


Inside the clock are gears, try to show such. The gears are metaphors for all the things which help move us to stay in time/tune with God. Church, teachers, scripture, prayer. You get the idea.


  • WE vibrate when God's Spirit charges us.  
  • We get "in tune" with God.
  • The church amplifies our common energy to make things happen.  


I'll let you flesh out the rest, but basically, one thing vibrates/moves another. What vibrates your spirit? or moves you to action?  How does God do that? WHO does God do that through?  Esther allowed herself to BE IN THE RIGHT PLACE FOR THE RIGHT TIME, to be used as an instrument of God to save her people.


Application:

HOW DO YOU KNOW WHAT TIME IT IS? How do you know when it is the RIGHT time to speak up?  When the spirit "moves" you?  When the words of scripture or a friend moves you to act.   Now you see why the clock needs two dials --to represent the two types of TIME we live in. 


PS...some might think it's extravagant to spend $6 per kid on a clock it, but it's a project that has lasting quality.  If its beyond your budget, just get a few kits and have the kids make a few clocks that can go on display in classrooms and hallways to serve as a reminder.

 

Last edited by Rotation.org Lesson Forma-teer

Purim Masks


From an idea posted by Neil MacQueen


The Jewish Purim Festival celebrating Esther and Mordecai's victory over Haman has elements in it of parades, carnival, and masquerades. 


Thus, the making of masks to hide or reveal your true identity would be a worthy art project.

Who do people think you are?

Who does God want you to become?

Esther had one identity, but was asked to stand up an assume a true identity as a child of God.


Masks can be made in a variety of ways...

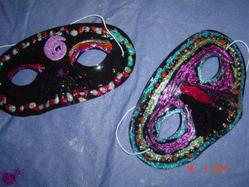
 Art Esther Purim Masks by Hampton United Church, ON, Canada

Full face masks made out of plastic cast material.

Decorated paper plates on a stick

Decorated masquerade-style eye masks.


In addition to the typical painting and decorating supplies, you could have student collage pictures from magazine that express one identity (perhaps false identities of beauty and athletic).  What pictures of life does God want you to put forward as your face to others?


Purim costumes are also a popular way to celebrate Purim. The more ridiculous the better.


Sites on how to make masks or with printable masks:


If any of the links don't work, go to the site and search.


Photo from Hampton United Church, Hampton, ON, Canada, posted by Luanne Payne.


Attachments

Images (1)
  • Art Esther Purim Masks by Hampton United Church, ON, Canada
Last edited by Luanne Payne

Art Workshop Idea:

Making Haman Boo Buckets


After our Esther Bible study and focus on Esther 4:14 ("for just such a time as this"), we had our kids make their own "Haman Boo! Buckets."  Of course, you know the Jewish tradition of booing the name of Haman. We taught our kids that tradition and had used it during the previous weeks computer lab lesson (Awesome Bible Stories CD's Esther) and in the week before that when showing the Video (Whats' in the Bible? DVD #7 Part 2 about Esther).  


We taught them that, like Esther, they should "boo evil and wrong" whenever they see it or hear it. And discussed that in our Bible study.


After the study, we had the kids decorate a small 6" high galvininzed pail (buckets were $2 each at Hobby Lobby) that went home with them.  Figure 20 minutes for making the buckets.


Four steps to making the Haman Boo! Buckets:


1. Have kids write "Haman Boo! Bucket" on a piece of tissue paper and glue it to the side of the pail.


2. Have kids write the short version of Esther 4:14 on a slip of white paper and glue it INSIDE the bucket.


3. Have kids tear up 1" x 2" pieces of colored tissue paper. On pieces of the tissue paper, have them write down one of the "Boo" words we discussed and LISTED on the board during the Bible study. Suggested "Boo" words: "unkind"  "mean"  "stealing"  "bad word"  "bully"  "unforgiving" "unhelpful".


4. Glue the tissue papers to the outside of the pail to decorate it using Elmer's glue you have thinned with water. Use a small craft brush to FIRST brush the glue onto the pail, then place the tissue over the glue, and brush the tissue into the glue. (This is a familiar gluing technique in may art projects. You can use the product "Modge Podge" but watered down Elmers is the same thing).


What they did with the Buckets at home:

  • They take them home and put them on the kitchen table. 
  • They put a bunch of COINS in a bowl next to the bucket and explained the Haman Boo! Bucket to everyone in their family. All can participate. (Could even be a dinner discussion.)
  • Then whenever they hear a bad word, snippy attitude, or hear/experience an unkindness, they put a coin in the Haman Boo! Bucket. It makes a nice loud sound when you drop a coin into these galvinized pail.

    Alternately, they could take a coin OUT of the bucket when they saw someone do right, do something kind, helpful, etc.
  • At the end of the week or month, they collected the coins and "did something good for someone in need,"  or brought them to church for an offering.
  • We gave each of the kids several dimes to start their buckets.


NOTE:

You don't have to use galvinized pails. We originally looked for plastic bowls. Another idea we had was cheap china bowls. The idea was that the coin would make a nice noise and sit on the kitchen table.

Last edited by Rotation.org Lesson Forma-teer

Add Reply

Post a New Topic
Lesson or Resource
Rotation.org Inc. is a volunteer-run, 100% member supported, 501(c)3 non-profit Sunday School lesson ministry. You are welcome to borrow and adapt content for non-commercial teaching purposes --as long as both the site and author are referenced. Rotation.org Inc reserves the right to manage, move, condense, delete, and otherwise improve all content posted to the site. Read our Terms of Service. Get a free Registered Membership or become a Supporting Member for full access to all site resources.
Rotation.org is rated 5 stars on Google based on 51 reviews. Serving a global community including the United States, Canada, United Kingdom, Australia, New Zealand, S. Africa, and more!
×
×
×
×
Link copied to your clipboard.
×
×