
Bringing the Bible to Life Using Puppets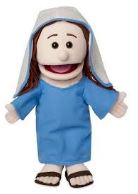
The first post in this topic is a Puppet Workshop "manual" from Amy Crane, one of our most prolific drama and puppet lesson and idea contributors here at Rotation.org.
This "Puppet" manual is an expanded version of workshop guidelines written by storyteller Amy Crane for Palma Ceia Presbyterian Church in Tampa, Florida. It is a supplement to the lessons posted by Amy at this site.
Copyright Amy Crane.
Permission granted to freely distribute and use for non-commercial purposes, provided this copyright message is included.
Most churches do not have a "Puppet" designated room, but use there "Drama" room for puppets. For more "ideas" look through this Drama forum. For prime examples of great Drama Workshop lesson plans and ideas, see our Writing Team Lesson Sets (supporting member access required).
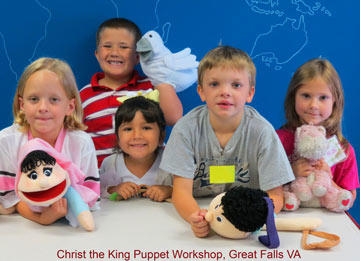
To see photos from Drama Workshops that include puppet photos, as I've shown below, go here.
The "Drama Workshop" is a specially designated and designed classroom in the Workshop Rotation Model through which different grades rotate each week. The lesson scripture and lead teacher stays the same during the rotation --meaning each week the teacher gets better and better at the Drama lesson. By designating a room as the Drama Workshop, it allows that room to develop staging and supplies that you don't have to remove after one use. Traditional Sunday Schools can easily adapt Drama Workshop lessons for their use.
The Goal of Storytelling with Puppets
The goal of storytelling with puppets is to encourage the students to creatively interpret a Bible story or theme through performance. As educators, we recognize that performing engages multiple learning intelligence's in a way that simply reading and talking do not. Dramatizing a story, including operating a puppet to move with the content, helps students focus and are terrific aids to content retention.
In a one hour session, the end product is not a polished performance, but a creative interpretation and understanding of a story that allows all present to participate equally. Emphasis is not on the facts, but on understanding the feelings, thoughts, and motivation of Bible characters and also on the sequence of events. Talent or a flawless production is not necessary for a quality learning experience, and sometimes can actually get in the way!
Most of the lessons I have written here at Rotation.org (search for "Amy Crane") do not contain scripted skits with lines to memorize. Pre-made Scripts can get in the way of both learning and performing. The purpose of the puppet lessons is to allow the students to really think about the story at hand, about the characters and their feelings and motivations. The teacher acts as a guide and questioner as the students outline and then dramatize the story. They may be aided by creating an outline of the story and "things they want to remember to say." In this way, the students are not acting so much as interacting and interpreting. (Some lesson plans do include a script skeleton to help the teacher direct the class's thoughts creatively.)
Using Puppets reduces problems with stage fright and shyness. It allows the energy to be focused on the puppets creatively interpreting the story, not the student impressing parents and others. That said, ideally, you have enough students so you can split into groups and the kids can watch each other perform the story. This often leads to enhanced discussion opportunity and improved performances as the kids learn from watching others.
And there's never such as thing as "one performance." For indeed, "doing it again only this time emphasizing _____, and not forgetting to _________," can be very creative ways to explore insights into the story and enhance retention of the content. Repetition is our friend ![]()
Let the Word of God come alive in your listeners/learners' hearts and minds. To become mature Christians, the stories of the Bible must be internalized. Stories are the basic language of faith.
Create a Unique Puppet Space
The more special and unique your meeting environment is, the more your students will feel that something special is taking place. Even if you are using space that is shared with other groups, you can add a few touches to make it into a Puppet Workshop.
Room Furnishings and Equipment:
The group gathering area seating should be comfortable and flexible. Folding aluminum chairs are fine if that is all that is available, but they are uncomfortable for small children whose legs dangle. A handy volunteer could make benches. Or have a pile of carpet squares or inexpensive bathmats.
A full-length mirror is an option to have in the room. If the mirror is in front of the puppet stage, it also allows the students to see how their puppets look when they are on-stage.
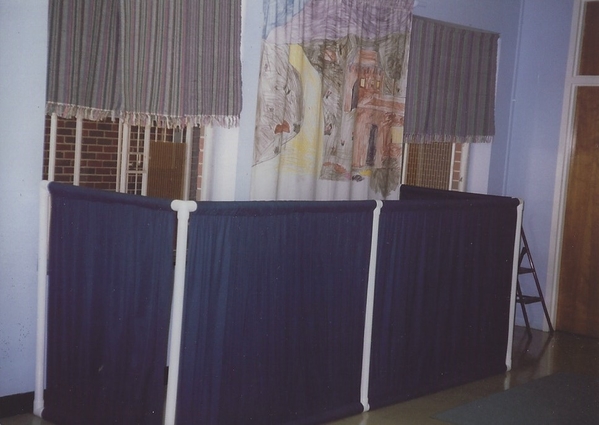
Puppet Stages:
Your puppet stage need not be elaborate, but you do not want it to be too small (as some of the store-bought stages often are).
Suggestions:
- Turn a six or eight-foot table on its side or cover it with a tablecloth or sheet. Or in the example pictured below hang a blanket along one side of your table.

- Make a frame with PVC pipe and cover it with fabric.
- Use cardboard from an appliance or refrigerator box.
- If you have space and handy volunteers, build something more solid and permanent out of wood. Check the public library: there are many books with simple and elaborate plans.
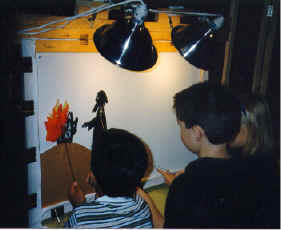
- Have a "spotlight" (clamp light) or two you can focus on the stage if you can turn down or off the classroom lights.
The most important thing to remember is that the stage should be big enough for your students to fit behind it. If you have large classes, you may have to:
* divide them into smaller groups and do a production twice.
* have only those currently "on stage" immediately behind the stage.
* have some students be in charge of props and narration.
Making Simple Backdrops
For simple backdrops for puppet shows: use plain white twin-size bed sheets. Outline a simple scene with black permanent marker and have the children color it with fabric crayons. The hem of the sheet fits over a curtain rod on the wall behind the stage.
Buying of Making Puppets
Evaluate your budget, class time, and frequency of use when making a decision on whether to buy or make puppets.
Making Puppets
The simplest and most basic kind of puppets to make is stick puppets. They are simple, flat, cut- out pictures on some sort of stick. Attach old flannel board figures to a craft stick. Cut out pictures from old Sunday School flyers and tape them to a straw. Draw a picture on cardboard and cut it out and glue it on a paint stirrer stick. These puppets can be used in a stage made from a small box with a simple background taped to the back of the box. Although these puppets are simple to make, they are not very interesting to use and should be used only occasionally.
Below are People-shaped wood craft sticks (do an online search - the ones pictured are 5 3/8" long and come with both male and female.)

If your sessions are long enough, students will enjoy making simple puppets to use and then take home. Puppets and Masks: Stagecraft and Storytelling by Nan Rump and Puppet Projects for Scripture Stories by Phyllis Vos Wezeman include many suggestions for puppets children can make themselves from inexpensive materials. Children's magazines and craft magazines often have creative suggestions that can be adapted for Bible stories. Puppets can be made out of almost anything, including craft sticks, paper bags, socks, fabric scraps, wooden spoons, and paper cups. The Bibliography lists other guidebooks, and your public library will have many other books on puppet making.
To make something sturdy and interesting for the classroom, e-mail me (amycrane@hotmail.com) for instructions for a stick puppet and a hand puppet. These can also be made by the students, or if time is short, put the puppets together before class and allow the students to add the faces.
Handle Bag Puppets would be made by someone in your congregation and used for any bible story.
Purchasing Puppets
If you decide to purchase puppets, One Way Street has all sorts of puppets and puppet supplies, including Bible-Time Puppets. The catalog states, "These Bible-time puppets are 14" - 16" tall and are very colorful and attractive. They are just right for acting out Bible stories or for any play calling for Bible characters. They are large enough for an adult hand, yet easily manipulated by children." See the Resource, Supplies, and Props section in the Appendix for contact information for this company and others.
Update: In April 2022, Kristofer Sommerfeld Productions acquired a majority of the assets formerly belonging to the company Creative Ministry Solutions (was creativemin.com), previously One Way Street, INC. here is the new link is https://oneway2.com/ .
Check catalogs and stores at Christmastime for sets of puppets for the Christmas story and for creche scenes designed to be played with and manipulated. Sometimes these puppets are generic enough in appearance to be used in other stories.
Puppets can also be made with something as simple as felt tied around a hand, a decorated lunch bag, even a "prop" like a spoon with two googly-eye stickers stuck to it. In the Rotation Model's Story Table Workshop, they often use posable figures (Bible characters, Super-heroes, even Lego). These can be used as puppets -either manipulated by hand or stuck to a dowel rod to make it more like a puppet.
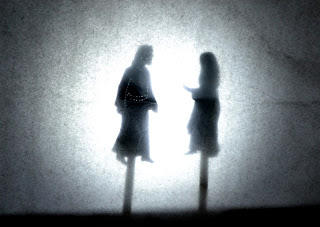
Even the kids themselves can be "puppets." You could play a game where a couple of kids are "posed and moved" by the puppeteers as the story is read. Moving in Blacklight or as a Shadow Puppet is a form of puppeteering yourself. The basic difference between puppets and drama being that the puppet is an EXTENSION of the actor, not the actor him or herself. The puppet being an object, or your shadow, for example.

Finally, for more help with puppetry, contact Puppeteers of America, an organization that supports puppetry and has a Puppetry Store for books and puppet items. There also are local guilds around the country that offer excellent workshops. See the Resource, Supplies, and Props section in the Appendix for contact information.
* Care of puppets (they are an investment and must be treated with respect):
- Treat puppets gently; they are fragile.
- Do not leave puppets laying on the floor where people can step on them.
- Do not bite anything with the mouth of a talking-mouth puppet - that will break the cardboard stiffener.
- Do not bang the puppets together. There should be no contact between puppets. Respect personal space.
Props
The performances are meant to be done with minimal equipment. However, if you have storage space you may want to collect some things to have on hand for when the need arises.
* example: a doll for stories with babies ("puppet- sized" for puppetry)
The Nuts and Bolts of Bringing the Bible to Life in the Puppet "Workshop"
Structuring Your Time with your Class:
My lesson plans here at Rotation.org are written using the following meeting time schedule. Adapt this schedule as needed to fit the needs and time constraints of your group. The critical events that should take place for a successful lesson are presenting the story, considering the story, retelling the story, and reflecting on the story.
In some churches, the arrival time and hearing of the story take place in a larger group assembly. That arrangement will work with these lesson plans, but the following principles still apply.
Arrival:
* Greet the children warmly and quickly check in (how is school, new baby sister, etc.).
* If necessary, distribute nametags as the students arrive; mark the attendance sheet.
* If not all the students arrive at once, have the early arrivals help set up for the current day's activities in the puppet worshop, children can practice manipulating puppets and background scenery for the current or next month's unit. If there are picture book versions of the week's lesson, children may sit in a tent or other quiet space to look at them.
Group time:
* Gather in the seating area of the room for the lesson. You should be able to make eye contact with each child. If possible, have them sit in a circle so they can see each other as well.
* Welcome everyone, especially visitors. Introduce yourself and your helper(s) by name.
* Pray for illumination (ask for a volunteer, but don't push). The prayer should be a simple opening to set the tone for the discussion and activity to follow. For example: "Thank you Lord for bringing us together today to receive Your word. Help us to hear Your word, keep Your word, and take Your word to share with others. Amen."
* Share background or clarifying information for the lesson, if necessary. For example, in the story from Acts about Peter's vision, children will understand the story more fully if they know that there are certain foods Jews were forbidden to eat.
* Have everyone open a Bible to the scripture for the lesson. The Good News Bible/Today's English Version is very readable for elementary aged students (even first graders can read much of it by the end of the school year). Make sure you teach students to use the table of contents as well as indicating approximately where in the Bible to look for certain books.
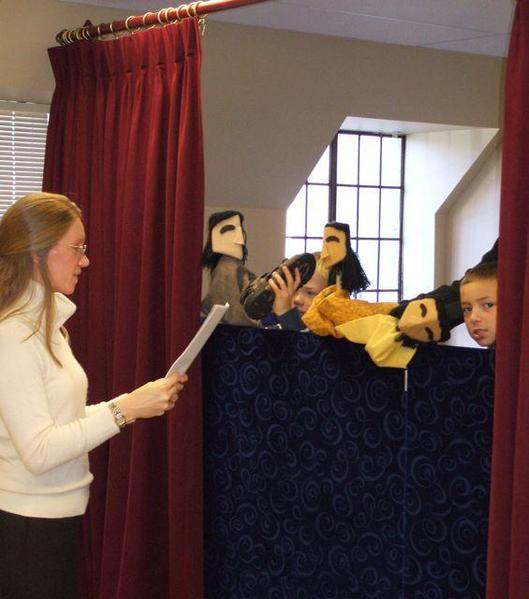
* Present the story: Read the scripture out loud: the teacher reads to first graders at the beginning of the year; in older grades volunteers read a verse or a paragraph at a time. Do not force anyone to read (they get that enough in school). Do not stop the reading to ask questions or explain things (other than name pronunciation or to help with an unfamiliar word); the Bible reading should be uninterrupted.
Note: Puppetry isn't just the activity you do "after" the study! It could also be what you do to introduce the topic, and conduct the scripture reading through puppets as the puppeteer speaks. Our goal again isn't "performance" but engagement, attention, and retention. You can even close the lesson with puppets offering the prayer.
* Sometimes additional storytelling is necessary to put the scripture into context, especially if the scripture is too long to read in its entirety (i.e. the story of the Israelites' exile and Moses' trips to Mount Sinai to go with the Ten Commandments lesson). See the chapter on storytelling in this book for further guidance.
* Consider the story: Talk about the story: initial reactions, characters, feelings, actions, motivation.
* Do some group warm-up exercises (how would Moses stand when he sees the golden calf?; how would Mary, Joseph, and others hold baby Jesus?; how would David stand and how would Goliath stand?). Warm-up exercises are important to help with the transition from ourselves into our imagination/other people. They help overcome self-consciousness and encourage teamwork. Allow the children to respond imaginatively and creatively. There are no wrong answers in these exercises. Understanding feelings is more important than acting skill. Suggested warm-up exercises are included in each lesson plan.
Performance:
* Outline the story for performance either verbally or on a flipchart or chalkboard (list key events or phrases).
* Review the principles of the performance type to be used (see following). Make sure that your instructions are clear and that everyone understands before you begin.
* Assign parts for the first run-through and distribute puppets and props. If time permits, the story can be done again with different parts assigned. If more than one person wants a part, draw names or lots.
* Retell the story: Dramatize the story (several times, if time permits).
* After each performance, ask for suggestions for improvements and revisions. What was left out? How can we better express a character's feelings? This discussion should focus more on content than on performance skills, but it should also be noted if a character's voice could not be heard or a puppet could not be seen. Remember, the goal is not a polished performance.
Pulling it all together:
* Reflect on the story: Gather again for discussion of the story, debriefing, and reactions. After you ask a question, wait. The silence may seem painfully endless, but often a moment is required for the students to think and collect their thoughts. Start with a few simple, fact- based questions before getting to more philosophical discussion.
* Make sure you allow adequate time to answer the children's questions as well as go through the closing discussion questions. Remember, there are no right or wrong answers. Often, "I'm not sure, what do you think?" is a good start to answering a child's question. And then make sure you listen to their answer.
* Close with prayer. Allow for participation when appropriate ("Dear Lord, thank you for creating ____.")
Clean up:
* puppets must be put away before anyone is allowed to leave the room (an important lesson in responsibility).
* For those waiting for parents to pick them up: put away chairs, rugs, props, etc.; continue working on costume elements, props, or scenery; look at books. Take this opportunity to chat with the children about what is going on in their lives, trying to relate the discussion to the lesson, if possible.
Puppetry Methods where Puppets act out the story:
Methods used will depend in part on the length of the story and the age of the group.
- Students improvise dialog and movements.
- Students improvise dialog, and record it on the tape. The puppets are then used to act out the story as the tape is played.
- The leader is the narrator and the children manipulate the puppets to coordinate with the narration. The students have opportunities to improvise and fill in dialog.
- Someone reads the story from the Bible and puppets follow and fill in the dialog.
- Students read lines from a script as they manipulate the puppets. (Manipulating a puppet while reading a script loudly enough to be heard is difficult, and this method is not recommended unless you spend a great deal of time learning the script.)
Puppet Manipulation Tips
* Do not turn your puppet's back to the audience unless the story line requires it.
* Exiting and entering the stage - do not pop the puppet straight up. It should move onto the stage as if it were climbing stairs, and exit by turning and going down the stairs.
* Hold puppet high enough so that it can be seen, but not so high that your arm shows. (Depending on the stage and the height of the performers, a bench or chairs or stools may be necessary behind the stage.)
* Only the puppet that is talking should be moving. Others should be listening politely (or behaving as appropriate in the story).
* If you are using moving mouth puppets, review mouth manipulation techniques. Open the mouth for each syllable, and close the mouth when the puppet is not saying anything. The mouth does not always open all the way (whispers are partly open, yawns and shouts are full open). When the puppets are not talking, their mouths should be closed.
* With mouth puppets, your extra hand moves one of the puppet's hands.
* If story scripts are recorded in advance, there should be time on the tape for movement, changing scenes, entering and exiting the stage, etc.
* Movement should be exaggerated so it can be interpreted by the audience. But the movement should not be so exaggerated that it detracts from the story.
* Warm up/manipulation practice: play "Simon Says:" jump, shake and nod head, hug, cry, look happy or surprised, sleep, get sick, climb stairs, pray, run . . .
* Special care is needed when introducing puppet activities to older children; they sometimes feel puppets are for babies. Consider inviting a Preschool or Kindergarten class to see the performance at the end of the session. (They will enjoy it, even if it is a rough performance -- particularly if they are studying the same story.)
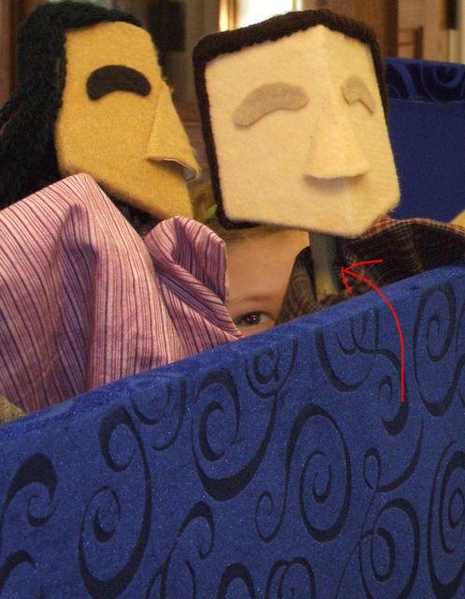
* Because this is not intended to be a polished performance, it is okay if the puppeteers' heads show. We are more concerned with conveying the Bible story than having a "pretty" presentation.
There are many books available on puppetry techniques (most public libraries have a shelf-full). Storytelling with Puppets by Connie Champlin is particularly helpful.
Using puppets creatively with children: (a number of these books are designed for a secular classroom setting, but techniques can be adapted for use in Church)
- Champlin, Connie. Storytelling with Puppets (second edition). Chicago: American Library Association, 1998. (Includes excellent sections on making puppets, manipulation techniques, and warm-up activities.)
- Irving, Lynn. Pocketfull of Puppets: Poems for Church School. Austin, Texas: Nancy Renfro Studios, 1982. (Especially good for working with preschoolers.)
- VonSeggen, Dale and Liz. Puppets: Ministry Magic. Group Books, 1990.
- Wezeman, Phyllis Vos. Puppet Projects for Scripture Stories. Prescott, Arizona: Eductational Ministries, Inc., 1995.
