![]() This topic is for posting your Art Workshop lessons and ideas for teaching the story of Pentecost Acts 1 and 2.
This topic is for posting your Art Workshop lessons and ideas for teaching the story of Pentecost Acts 1 and 2.
Please lean towards "art" and not so much towards "craft".
Please consider including 'alternate' materials/approaches to your project.
Please include age-appropriate adjustments.
Welcome to our public Pentecost ~ Acts 1 and 2 ideas and lessons forum. Don't forget to check out the supporting members' "Wind, Fire, Faith!" Pentecost lesson from our Writing Team. The lesson summaries and Bible background are open to all. If you're looking for Ascension lessons and ideas, go to our Jesus After the Resurrection forum.
Replies sorted oldest to newest
Pentecost
Art Workshop
Summary of Lesson Activities:
The children will express their feelings of the Holy Spirit and their vision of the coming of the Spirit by creating collage artworks.
Scripture:
Acts 2
Memory Verse:
"But you will receive power when the Holy Spirit comes on you; and you will be my witnesses in Jerusalem, and in all Judea and Samaria, and to the ends of the earth." (Acts 1:8) (NIV)
Lesson Objectives for rotation
At the end of the rotation, the students will
- know where Acts is in the New Testament and know that it is the story of the early church after Jesus' death and resurrection.
- be able to retell the story of the coming of the Holy Spirit.
- begin to understand the role of the Holy Spirit.
- understand that the Spirt is with us as we are called to share the Good News.
- find their own answer to Acts 2:37 in response to the coming of the Spirit: "Brothers, what shall we do?"
- repeat the memory verse.
- interpret some of their feelings and understandings of the Holy Spirit using words and/or art.
- pray a Breath Prayer.
Teacher preparation in advance:
- Read the scripture passages and lesson plan and attend the Bible Study, ___. It will be very important for you to attend this Bible Study.
- Check out the room before your first Sunday workshop so that you know where everything is located.
- Purchase or request additional supplies from ____.
- Learn the memory verse.
- To our teachers at RCC: The design of this workshop is very intentional. The activities and discussion questions for this workshop were designed to meet the goals of the entire rotation and the educational objectives of the Rotation Model (tm) at River Community Church. While we feel it is important to follow the serendipitous leading of the Holy Spirit, please do not change the lesson plan without consulting a Curriculum Planning and Writing Team member.
- Cover worktables with newspaper or tablecloth so cleanup will be simpler. Have a separate table set up with collage supplies so the students can study the available materials.
Supply List:
- candle (a red pillar candle would be especially appropriate) and matches
- a piece of posterboard or cardboard for each child's artwork (at least 8 ½ by 11 inches)
- all sorts of red supplies: construction paper, tulle, pipe cleaners, sequins, cupcake papers, pom- poms, ribbon, glitter, yarn, fabric scraps ...
- glue sticks
- white glue for holding heavier collage items, paper plates, and cotton swabs. (Rather than letting the children squirt the glue from the bottle onto their artwork, pour some glue into a paper plate and let them paint the glue where it needs to be with a cotton swab.)
- markers and crayons
- scissors
- red pencils and pens, white paper
Lesson Plan
Opening:
Greet the children and introduce yourself. Wear your name-tag. Make sure the children are wearing name-tags. If not, ask the shepherd or co-leader to supply a temporary badge. Remember, you are interacting with a different group of students each week who may not know you.
We had an opening prayer during the gathering time, but you may open with prayer if you feel led to do so.
Explain the purpose of this workshop. Use kid friendly words to give a brief overview of what the children are going to learn and do. Ask them what they think of when they see the color red. Explain that in the church it is the color associated with the Holy Spirit. "Think about why that might be as we read the scripture."
Scripture/Bible Story:
Read the scripture: Acts: 2: 1-14, 22-24, 36-41. (Encourage the children to use their Bibles in looking up verses and reading out loud or reading along. )
Dig:
Application:
Pentecost is often called the birthday of the church. Any guesses why? [accept reasonable answers, but make sure you talk about how the new believers were baptized and brought into fellowship with the disciples]
Any guesses on why red is the color associated with the Holy Spirit and the celebration of Pentecost? [accept all reasonable answers, but make sure someone remembers the tongues of fire from the story]
What do tongues of fire and flames look like? [after taking suggestions, light a candle so all can see] Sometimes it is hard to use words to describe something we see every day. When Luke wrote the stories about the early church in the book of Acts, much of it was just telling about the adventures of Peter and Paul and the others. But the coming of the Holy Spirit was strange and miraculous. Nothing like this had ever happened before. Luke had to use words his readers would understand in his report: he said the coming of the Holy Spirit was like the sound of wind and tongues of flame.
Who is the Holy Spirit? [this is a tough question that many adults cannot answer. Make sure discussion includes that God is three: Father, Son, and Holy Spirit. The Holy Spirit was sent to be with us after Jesus ascended to heaven; refer to the memory verse. Additional discussion can take place while the children are working on their art. Really hard questions can be passed on to the Pastor; make sure his responses are relayed to the children.]
I want you to think about the story we read from Acts about the coming of the Holy Spirit and about what happened afterwards. We have all sorts of materials here that you can use to express the story and your view of the Holy Spirit. Remember, your artwork does not have to be a picture of what happened that day. It can instead be a picture of your feelings about who and what the Holy Spirit is and what he does.
As the children work, talk about the choices of materials and textures and shapes and colors they have made. What feelings and pictures are they trying to convey?
Also, ask some wondering questions while the children work. All of the adults should move around the tables for discussion as the children work. These questions may or may not receive answers, but should cause reflection. Please allow time for thoughtful responses as the children work. Remember, there are no right or wrong answers.
- I wonder what it felt like to receive the gift of the Holy Spirit on Pentecost?
- I wonder what Jesus' friends were saying when they spoke in all those languages?
- I wonder how Jesus' friends felt as they told the people amazing things about God?
- I wonder how the people felt when they were baptized and received the Holy Spirit?
- I wonder how they knew this was the Holy Spirit?
- I wonder what all of these people will do now that they have the gift of the Holy Spirit?
Warn the children that 5 minutes for working on the art project remains about 10-15 minutes before the end of the class time. (Children who finish their collage early can help clean up and can practice writing/copying the memory verse in red pencil or pen on a piece of paper.)
Reflection:
Pulling it all together (closing discussion):
- Can we have the Holy Spirit in us? How?
- I wonder what we should do with God's gift of the Holy Spirit?
Review the memory verse. Ask for volunteers to say it by themselves. (If it is early in the rotation and no one knows it yet, practice it phrase by phrase, with the teacher saying it and the children echoing.)
Closing prayer: Breath prayers (adapted from 7 Ways of Teaching the Bible to Children, page 91)
Everyone should be seated comfortably in a circle on the floor. Talk about breathing, how we always breathe without even having to think about it. Take a few deep breaths and let them out slowly. Ask the children to blow on their hands to see if they can feel their breath.
Say, "The Holy Spirit is always as close to you as your own breath. God is always with you."
"A breath prayer is a very simple prayer that is repeated over and over as you breathe in and breathe out. Say ‘Dear God' as you breathe in and ‘be with me' as you breathe out. Say it very quietly while you breathe. It will take some practice to talk quietly as you breathe."
Remind the children that they can say this prayer anytime and anywhere and it will help them remember that God is always with them.
Depending on time, you may wish to say another prayer to send the children home:
Dear God, thank you for sending your Spirit to be with each one of us always. Help us to feel your Spirit, to hear your Spirit, and to follow your Spirit as we are led to share the Good News with the world. Amen.
Additional Suggestions:
Older children may choose their own words for their breath prayer. The only rule is to have no more than three words as you breathe in and three words as you breathe out.
Younger Children:
help them with cutting art materials as needed.
read the Pentecost page from Come Worship with Me to help them form some more concrete ideas about Pentecost before starting the collages (their artwork may be more representational and less symbolic and this reading may help them develop some ideas).
Resources
- Boling, Ruth. Come Worship with Me: A Journey Through the Church Year. Louisville: Geneva Press, 2001.
- Bruce, Barbara. 7 Ways of Teaching the Bible to Children. Nashville: Abingdon, 1996.
- Stewart, Sonja M. and Jerome W. Berryman. Young Children and Worship. Louisville: Westminster/John Knox Press, 1989. (Source of some of the "I wonder" questions.)
- Art idea posted by Dena at the rotation.org site under Pentecost - Art
- Scripture taken from the Holy Bible, NEW INTERNATIONAL VERSION®.Copyright © 1973, 1978, 1984 International Bible Society. All rights reserved throughout the world. Used by permission of International Bible Society.
This lesson was written by Amy Crane for River Community Church in Prairieville, Louisiana.
Copyright 2003 Amy Crane. Permission granted to freely distribute and use, provided the copyright message is included.
Idea posted by member Neil MacQueen
A Pentecost Sidewalk "Chalk--Walk"
Students mark large SIDEWALK CHALK DRAWINGS of flames, Pentecost, Holy Spirit, and key words/phrase from Acts 2 --for the congregation to see and experience when they go outside after worship.
As part of the chalk artwork... Students can make a prayer labyrinth or PATH with "Pentecost Stations"for congregation to walk, stop and consider.(these 'stations' can be words/ideas for sharing the Good News written in chalk)
Older kids can create the basic designs and ask young children to "color it in".
At the end of the 'trail of Pentecost Chalk Walk stations' the congregation can walk past a gallery of "Pentecost Kids" self-portraits and names of all the artist.
Congregants can be given chalk and encouraged to add their pictures or phrases.
Take photos!
Pentecost Art idea posts moved to consolidate topic...
Kim Trimboli
Posted May 14, 2002
Art Rotation for Pentecost (Kites!)
Classes will be making and flying kites - the wind reminds us of the Holy Spirit.
Read Acts 2:1-41 - It is a long passage, but full of signs, symbols & action. As the kids to listen with their senses: a group of kids to listen for what the people could hear, a group listening for what they could see, a group for feel, a group for taste and smell. Have them report what they discovered.
Make Kites - as a decorating idea (particularly if the weather will not be good enough to go outside), have them draw, color, create symbols of the holy spirit on the kite. Wind, Flame, Dove are popular symbols. The colors of flame would be appropriate as well, if they don’t want to draw.
If time and weather allow, take the kits outside and try them out! If the yard is too wet, the back area of the parking lot should be fine.
Big Wind Kite Factory, Moloka'i, Hawai'i presents:
20 Kids * 20 Kites * 20 Minutes
Uncle Jonathan's easiest classroom kites ever. www.aloha.net/~bigwind/20kidskites.html
For over 15 years the Big Wind Kite Factory has been giving kite making classes for the children on the island of Moloka'i in Hawai'i. These are the complete time tested instructions to get 20 kids making their own kites and flying them in 20 minutes.
Material list:
- 20 sheets of brightly colored 8 1/2" x 11" typing paper.
- 20 8" bamboo bar-b-que shishkabab sticks.
- 1 roll of florescent surveyor's flagging plastic tape. Available at any hardware store. A plastic bag cut in a 1" wide spiral all around will also make a great tail. Or streamers…
- 1 roll 1/2"wide masking tape or any type of plastic tape..
- 1 roll of string. (At least 200', 6 to 10 feet for each child.)
- 20 pieces of 1"x 3" cardboard on which to wind the string.
- Scissors.
- Hole punch. (optional)
Directions:
- Fold a sheet of 8 1/2" x 11" paper in half to 8 1/2" x 5 1/2".
- Fold again along the diagonal line A in Fig.2.
- Fold back one side forming kite shape in Fig.3 and place tape firmly along fold line AB.(No stick is needed here because the fold stiffins the paper and acts like a spine.)
- Place bar-b-que stick from point C to D and tape it down firmly.
- Cut off 6 to 10 feet of plastic ribbon and tape it to the bottom of the kite at B.
- Flip kite over onto its back and fold the front flap back and forth until it stands straight up.(Otherwise it acts like a rudder and the kite spins around in circles.)
- Punch a hole in the flap at E, about 1/3 down from the top point A.
- Tie one end of the string to the hole and wind the other end onto the cardboard string winder. When you are in Hawai'i please be sure and drop in for one of our factory tours.
- There's one starting in about 3 minutes.
Our email address is bigwind@aloha.net> us your comments or requests for additonal information
Kite flying was first documented in the South Sea Island by fishermen, who used to attach bait to the tail of a kite and web and then wait to catch a fish.
Today, kite flying is more than just a passing fancy or means of catching dinner. Many have made their careers out of constructing and flying kites.
mabethea
Posted May 06, 2008
Pentecost/Holy Spirit Wind Socks
Materials:
- Red bags
- Red ribbon (18” strips)
- Red, orange, yellow crepe paper streamers
(12” strips) - Descending Dove symbols
- Glue Sticks
- Scissors
- Hole punchers
- Pencils
- Carefully cut off just the bottom panel of the bag
- Fold over on the crease so that the bottom is now the reinforced top
- Hole punch one hole in each long side of the folded top
- Write your name inside the windsock
- Attach the red ribbon to the bag by tying ends in holes
- With a glue stick, glue one dove symbol to one side of the bag
- Cut 3 12” strips of each of the crepe paper streamers (red, orange, and yellow)
- Using glue stick, glue the strips inside and around the bottom of the windsock, alternating colors.
A representative of Rotation.org reformatted this post to improve readability.
The following idea was originally posted by member Luanne and updated by Neil.
Pentecost Flame Lantern
The basic idea:
Your students will punch a Pentecost design into a thin piece of art-sheet-metal, fold the edges over, then roll the metal into a cylinder and place the cylinder about 1/2" down into a base.
Inside the lantern, you will then place a very inexpensive "tea lantern" ...battery operated lamp. Get plenty of extras! Check online to buy them in bulk, less than 50 cents each.
The "Punches" are nails of various diameters, some large, some small.
You can also use a small pair of scissors to cut out larger areas, but punching is preferred.
There are various types of metal you can punch. Check with your local art supply. You want something soft enough to punch holes so the light can come back out. You will need about 14" x 6" per student to make a cylinder about 5 inches across and 6 inches high.
Place a couple of thick beach towels on the table so the 'punches' can get through the metal which are laid on the beach towels.
Use the tip of a nail to first draw your design on the metal.
Use small blocks of wood to 'hammer' the punch into the metal.
About the Base:
You don't need a base as the rolled cylinder can stand on its own over the top of a tea light. Use a stapler to fasten the edges of the sheet to make the cylinder (or fold the edges together to make a seam). If you want a base, you can make one out of the art-sheet-metal by folding and cupping it into a round shape with a flat bottom, then gluing it with quick drying glue inside the cylinder's bottom.
You can also glue or tape pieces of colored (red/orange) cellophane on the inside of the cylinder over some of the holes.
Please remind students that they should NOT replace the tea light with a candle. Offer to give them a replacement tea light if they wear theirs out.
These lanterns can made prior to Pentecost and brought into the sanctuary as an offering of "flames" on the Communion Table.
The following MISC Art Workshop/Celebration Ideas were gleaned from a previous forum here.
Make a TRINITY WIND CHIME out of 3 metal 'rings' --the kind found in a craft store. Hang nails in middle of center ring. Rings can be different sizes. You can tie ribbon or feathers (representing the dove) to hang from a ring(s).
If it is not wind day bring a fan and have the student hold their chimes so you can hear the sound. The nails are to remember Jesus Christ Died on the Cross for our sins. And each time you hear the sound of the chimes remember Jesus Said he would send the Holy Spirit to be with us.
Make Origami Doves and hang on a mobile from the ceiling of the church on Pentecost Sunday. (Note: origami cranes can also become 'prayers', hopes and dreams for the church. You can set them free by giving them away to the congregation. Inside each one can be a verse and specific encouragement.)
Our older children will be making crosses from burnt wooden matches a ancient church camp craft) while the younger ones will be making wind whirleys (easily made with dowels, a pin and posterboard they have decorated)
We made t-shirts for the art portion of our Pentecost rotation. I cut out doves and flames from cardboard, and the children painted them red and used them as stamps on their shirts. We also included our memory verse, Acts 1:8 on the backs of the shirts. I was able to find the shirts at the craft store for $2.99, so each project cost less than $4.
While reading the Kirk of Kildare Pentecost lesson - they talked about a microphone being passed around for kids to talk into. This reminded me of the native American talking stick.. Making this stick would be a great art project for Pentecost with all the symbolism that is attached to the stick and Pentecost - see this website for info about the talking stick. Info at https://elunanetwork.org/resou...tivity-talking-stick.
Moderator removed dead link and replaced with another link.
We are doing the kite idea this Sunday (May 31) To incorporate the idea of tongues, I used a site called freetranslate.com to translate the phrase "Come Holy Spirit" into as many languages as I could find. We will be copying the phrase onto the kites and sending them skyward
Make temporary tattoos of Pentecost symbols, such as flames, doves, or a special cross.
See my description and resources for how to print temporary tattoos using your inkjet printer here in the Art Workshop ideas discussion.
Attachments
Pentecost Pinwheels that catch the breeze...
White plastic writeable/paintable pinwheels are available for cheap in bulk (check Oriental Trading). Kids can first write messages on parts of each pinwheel and paint the other parts of the pinwheels with a very thin coating of acrylic paint (acrylic sticks to the plastic). Would make a good Pentecost Sunday sidewalk display (like Xmas luminaries) that can go home to encourage Pentecost behaviors (spreading the word).

Pentecost "We are One in the Spirit" spinning wheel
a new take on an old toy known as "Newton's Color Wheel."
In this video, the teacher used a pre-printed paper to make both sides of the disc (which they glued to a circular piece of cardboard. I'd recommend having the kids put key verses on one side and using traditional "flame colors" that will blend when spun.
On the other side of the disc you can demonstrate "We Are One in the Spirit" by writing names of different people/churches/denominations/cultures, etc. in the different color sections then spinning. Make several to share with other kids and adults in the church.
Spirit Blown Pentecost Message Artwork
Supporting Members can see the Art Workshop lesson plan in the Writing Team's Pentecost lesson set that describes how to paint with your breath (spirit), and include a Pentecost message in the artwork that doesn't get covered by the paint.

Attachments
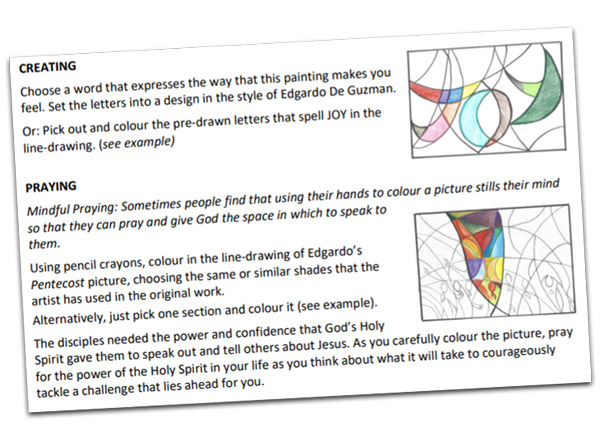
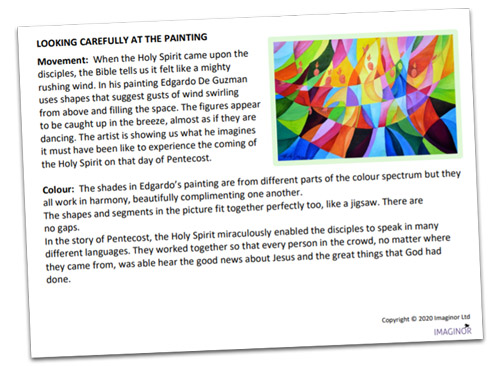
Here's a really neat printable Pentecost lesson with artwork and drawing templates free from Imaginor.uk
Inspired by the Pentecost painting and style of Philippine artist Edgardo de Guzman, this downloadable lesson pack offers children and their families a creative way to learn and engage with the story of Pentecost by learning how to draw the story in Guzman's style, as well as, artistically illustrate keywords like "JOY."
Tip: Using the line drawing, either draw with colored pencils or paint with watercolor

Download the lesson pack and larger images of the pictures.
Please note: The artwork may only be freely used with the lesson resource.
Pictured below: screenshots from the two downloadable PDFs

The full size "line" template is in the downloadable materials.
Attachments
This is fantastic!!
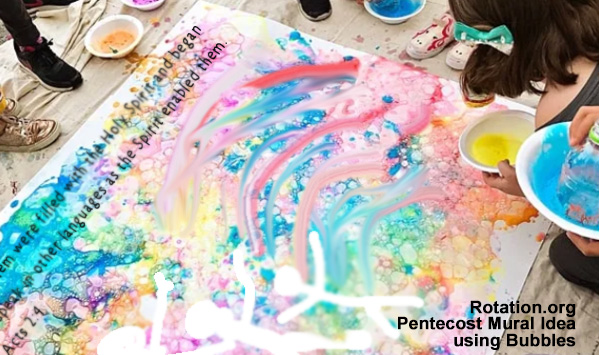
While working on a Bubble art idea for a Fruit of the Spirit lesson, I came across www.hellowonderful.com's Bubble Art ideas.
It uses a unique homemade "bubble blower" made out of a recycled plastic bottle and bit of mesh. You dip it into liquid dish soap that's been mixed with water and watercolor paint and it produces MOUNDS of bubbles (not the kind that blow in the wind). Check out their photos and instructions at https://www.hellowonderful.co/...ubble-art-with-kids/

I took one of their bubble project images and made a quick photoshop sample of how you could make the bubble art then "paint the rush of a mighty wind" into the bubbles using a brush or hands. You could also fingerpaint the "Pentecost crowd" and disciples into the mural, or cut them out of plain paper, lay them on the canvas, and remove them after all the bubble paint has been applied.
I'd probably change the color palette to be more "Pentecosty/Fire-y" ---ALTHOUGH, since the Spirit painted with "all the colors of the wind" we could too and the different colors represent all the different "tongues" (languages, kinds of people) of where, how, and to whom God wants us to share the good news.
Start with Dawn Free & Clear Dish Soap (or any other clear kind) and add water and colored paint to desired mix. A 6:1 water to soap is typical. The bubble bottle with the mesh produces large heaps of colored bubbles that drop onto the canvas, not the kind that blow in the wind.
My suggestion: Cover your kids with plastic trashbags to "contain" the bubble slurp.
Images used with permission from hellowonderful.co
