Art Lessons, Ideas, Activities, and Resources that teach the story of Jesus' Trial and Crucifixion.

Post your Sunday School ART lessons, ideas, activities, and resources for the Trial and Crucifixion stories.

Keywords: Cross, Jesus, Caiaphas, Pilate, Scourging, Nails, Centurion, Golgotha, Place of the Skull, Calvary, and related. Matthew 26, Mark 14, Luke 22; John 18, etc.

Related Forums:
Other types of activities/lessons for teaching Palm Sunday to Easter stories (games, drama, video, etc)
Lessons and Ideas that cover/encompass the "Overall" Story of Holy Week

Last edited by Neil MacQueen
Original Post

Replies sorted oldest to newest

Trial and Crucifixion

"Nail Cross" Art Workshop Lesson

Note: There are several posts in this topic about making nail crosses. The following kicks off the subject!


Summary of Lesson Activities:

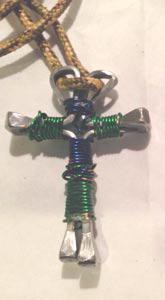
Make cross nail necklaces to help children remember that Jesus died so that we could have eternal life.

Scripture Reference:

Matthew 26:47-27:61; Mark 14:43-15:47; Luke 22:47-23:56; John 18:2-19:42

Key Bible Verse:
There the soldiers nailed Jesus to his cross. Luke 23:3 (International Children's Bible)


nail cross craft for Sunday Schoolnail cross craft for Sunday School


Materials List:

  • Nails. The "horseshoe" square kind are recommended because they are similar in shape to the "spikes" we believe were used by the Roman soldiers. They are also less pointy!   Note the way they are assembled so that their points are safely not at the 'ends' of the cross pieces. Note that we don't recommend those nail cross where the nails are bent to create necklace loop as this takes too much time, and attaching a wire loop is easier.
  • Craft wire, various colors
  • Glue gun or instant glue
  • Strips of leather thong to make the necklace.

Editor's Note: This is a lesson sketch. Enrich as needed.


Lesson Plan


Opening:

Greet the children and introduce yourself.

Open with prayer.

Dig:

  1. Read the story of Jesus' crucifixion from your preferred source, classroom Bibles or perhaps a storybook Bible.
  2. Review the story--answering any questions the class may have--to make sure the children understand it.
    Why did some people want to kill Jesus?
    What was it about his message they didn't like?
    What were the Romans afraid of?
    What type of Messiah did some people expect? (When Jesus didn't fit their definition, they charged him with blasphemy -- claiming to be the Messiah, etc.)

  3. Introduce the activity by explaining to the children that they are making crosses to help them remember the story of Jesus' crucifixion and that he suffered to bring us the message of our forgiveness, our salvation.

  4. Tell them that they can wear their crosses or hang them up in their rooms, etc. They can also give the cross to someone else; to help that person remember that Jesus died for us.

  5. Give each child four nails. Remind them that Jesus was nailed to the cross in three places--each hand and his feet. Help the children bind two of the nails together, using craft wire. You may want to use a glue fun to glue the nails together for younger children. These nails form the horizontal cross bar. Bind them to the second pair of nails using craft wire.

  6. Take another piece of wire and form it into a loop for where the leather necklace can be looped. To fasten it to the nails, twist the ends loop wire around the top of the vertical nail, Wrap additional wire over the loop wire to fix it to the cross. The GLUE can be used to make sure the ends of the wire stay tucked in.

  7. Thread a strip of leather through the loop and tie it to complete the necklace.


NOTE: Use rough square nails and pair them end-to-head so that no sharp point is sticking out on its own. Depending on your nail source, you can get a longer length for the vertical portion of the cross.

You can WRAP colored wire around parts of the nail to add color and texture.

If kids finish their crosses and time is left, encourage them to make another cross to give away. Or suggest that they make another cross out of different materials (e.g., pipe cleaners, craft sticks, wire and beads, crayons).

Reflection:
Invite each student to share their cross and explain what it will "remind them of." Conclude by piling them in the middle of the table and do a "laying on of hands" reminding the kids of the meaning, and asking God to bless us as these necklaces remind us "WHAT" Jesus did for us to "WHOM" we belong.

Originally posted by a member of the Irvington Presbyterian, Irvington, IN, and enhanced by members of our Content Team.

Attachments

Images (2)
  • nail cross
  • nail cross
Last edited by Neil MacQueen

Leather Working

The leather gave a chance to talk about the leather thongs that probably bound Jesus during his trial(s) and were part of the whip that beat him (why did Pilate have him beaten?). About his leather sandals which carried him to the cross (who could fill his shoes?).

The kids then heard the rest of story of the trials, and then used Christian symbol punches to decorate leather slots (all avaiable through craft suppliers). The "hammering" they had to do was a pretty effective reminder of what happened to Jesus, without being obviously graphic.

What could you make? A leather sign, a leather door hanger with leather strapping to hang it. Punch holes and thread rough nails around through holes to make a border, or whatever design the kids want to make that represents an idea from the story.

Last edited by Rotation.org Lesson Forma-teer

Miscellaneous Art Project Ideas
submitted by members and archived here... 

Cross Mosaic
When I was young, I made a cross mosaic of different seeds/beans (there are actually many different colored seeds/beans). We glued them onto a burlap rectangle background and frayed the edges on the bottom and two sides. The top was folded over and glued to make a slot for a skinny dowel. A fair length of yarn was then tied to either end of the dowel to make a hanging device. My mother still had this decorative piece hanging in a foyer until a few years ago and I am now 32!


Making Erasers
We will be making erasers to show that Christ died to erase our sins and that God then sees us as clean (page).. I purchased "Sculpey" Eraser clay from an art supply store @$7.99 - will make at least 12 erasers - my own kids and friends enjoyed making them - although not the best erasers


Denise Roth-Ludtke
Erasers
I love your idea about making erasers. It is a great idea. Here are a few more web sites that have kits for making erasers. There is also a site that gives a homemade recipe and then some information about erasers.


Kris Edscorn

Some results of a little web surfing:

"Sculpey's Amazing Eraser Clay"

"Pliatex Mold Rubber"

The Crazy Clay Eraser sets mentioned in a couple of the websites is similar to the Amazing Eraser Clay.

It would appear that the Pliatex method would fit a science workshop, but it is not colored and not very moldable. The Amazing Eraser Clay and Crazy Clay is colored and moldable, but must be baked (and cooled).

Last edited by Rotation.org Lesson Forma-teer

The Crucifixion

Art Workshop


Summary of Lesson Activities:

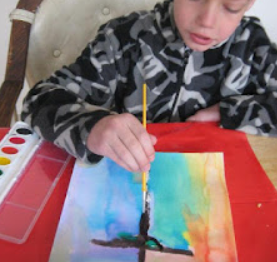
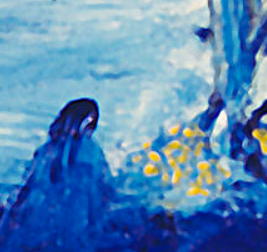
crucifixion-watercolorIn this workshop, the students will view and discuss many different images of Jesus’ crucifixion and will create their own painting Christ's crucifixion -- and paint themselves into the scene.

Scripture Reference:

Mark 15:1-47


Leader Preparation:

  • Review the scripture
  • Gather the Materials
  • This lesson requires that you familiarize yourself with the different styles and symbols found in Crucifixion art and print some examples.  The internet will be your friend here! The original author of this lesson used a book that featured religious artwork of the Crucifixion. You may find something of the sort at your local library or church library.

Setting up the stations:

You will move with your students to three stations. This is needed so that they don't become distracted by the art supplies which need to be put out ahead of time (so you will place them at the third station).

Station 1, Research Station: The Bibles and crucifixion art should be on a separate table used only for discussion.

Station 2, Materials: The wood (or paper) of various shapes and sizes should be easily accessible, so that the students may choose their own when they are ready to begin painting. (Note: The crackle coat will have been pre-applied to the wood surfaces, so that it has enough time to dry.)

Station 3, The Work Area: Before the students arrive, the paint, palettes, water, and brushes should be placed around the work table. In order to save time (and paint), it might be a good idea to go ahead and squirt a small amount of each available color onto each of the students’ palettes.


Materials List:

  • The book: Crucifixion compiled by Phaidon (or similar book or internet collected group of Cross artwork)
  • Bibles
  • Various crucifixion images
  • Acrylic paint or watercolor (or both!)
  • Pencils for sketching
  • Watercolor/artist's paper for their painting.
  • Paint brushes
  • Paper plates or palettes
  • Cups or jars of water.


Lesson Plan


Opening:

Greet the children and Introduce yourself.

Open with a prayer.

Dig:

Begin this brief discussion at the “Research Station.” Read or have the children read aloud Mark 15:1-47. Because some of the terms and concepts in this passage may be unfamiliar to the students, you may wish to retell the story in your own words and answer any questions the students may have before moving on to the second passage, Philippians 2:5-11.

Discuss the following questions with the students:

  • With what crime was Jesus charged?
    (Pilate called Jesus “The King of the Jews” and declared that the claims of miracles made by Jesus’ followers were lies.)
  • What does the word “crucifixion” mean?
    (According to Encarta Desktop Encyclopedia, crucifixion refers to the execution of a criminal by nailing or binding to a cross. It was a common form of capital punishment from the 6th century BCE to the 4th century CE. The Roman practice of crucifixion was abolished in 337 by Constantine the Great out of respect for Jesus Christ.)


Explain to the students that they are going to be looking at many different artists’ interpretations of Jesus’ crucifixion, spanning many times and cultures. Within each example are numerous symbols, techniques, characters, and emotions. Through looking closely at these images, the students will gain an understanding of the act of crucifixion as well as the impact Jesus’ crucifixion has had on the art world. (As the students are perusing the images, point out certain symbols seen in some of the images.

Note the choices of colors and shapes and what meaning/feeling they convey.

Ask the children to consider what is most important to them in the story of Jesus’ crucifixion and suggest that they focus on that concept in their paintings. The students may use a painting as inspiration for a design of their own. Give the students a moment to select the crucifixion image that most interests them, and then quickly get them settled with their supplies. Each student will select a piece of wood (or paper) from the “Materials Station” that meets their particular needs. They will bring the images and surfaces that they have selected over to the “Work Area” and begin their own interpretations of Jesus’ crucifixion.

painting-yourself-at-crossSuggest that the paint THEMSELVES into their cross painting. What would they be doing and thinking (posing like, looking like) at the foot of Jesus' cross?  What colors (mood) would they paint themselves with?

It will help them a lot if they first SKETCH in PENCIL the main objects/persons/shapes they plan on putting in their painting. Invite them to do it on scrap paper first. As they do this, circulate and offer suggestions and encouragement.  Once their test sketch is to their satisfaction, have them sketch it again on the watercolor/artist's paper that they will now paint.

Remind them and demonstrate with a brush how colors and brush strokes can help tell the story and emotion of a story or express their own feelings. Offer examples and demonstrate. Talk to them about whether they may want to be more realistic or "impressionistic", more symbolic or more real life.

Suggest that they do not have to paint the whole scene. They could, for example, paint Christ's face, or his hands, or the reaction of his mother, or several reactions. Draw a few examples of this.  They may also wish to focus on the surrounding ground and sky -- its colors and shapes, to convey the sense of darkness and hope in the event.

Help the students mix colors, if necessary.  Encourage those who paint more slowly, so that they have the opportunity to finish their masterpieces. Those who paint quickly can be encouraged to add more detail or address certain aspects of the story that may not have been illustrated in the particular example they chose. All students should be encouraged to work neatly and creatively. There are no “wrong answers” in art!

You may wish to play some music softly in the background to help set the mood. Keep in mind that some volumes and styles of music can produce anxiety.

Reflection:

Be sure the students all sign their paintings, then display their panels on the rail. Ask the students to explain why they chose the image they chose to copy or why they chose the image they designed. Discuss the use of color, line, perspective, etc. Finally, remind the students that when they get to take their panels home, they will have their own relic, which will always remind them that Jesus died for us, so that we may be forgiven for our sins. Because Jesus was crucified, we have no cross to bear.

Say a prayer of your own to close the workshop, or use the following:
Dear God, thank you for sending your son Jesus to walk this earth, to teach us, and to die for us. Thank you for your unending love and forgiveness. Please help us recognize your glory and to demonstrate your love each day. In Jesus’ name, we pray. Amen.


Adjustments for younger/older children:
Many of the images may be overly graphic for younger students. Use your own discretion. It is important, however, that the pain, violence, and suffering Jesus endured not be overlooked or eliminated in this study.


Some possible art references:

  • Bosch: The Complete Paintings, by Walter Bosing.
  • Art Across Time: Volumes I and II, by Laurie Schneider Adams.
  • Crucifixion, compiled by Phaidon Press.

A lesson written by Jan Marshall from: Brenthaven Cumberland Presbyterian Church
Brentwood, TN, and members of the Rotation.org Content Team

Attachments

Images (2)
  • crucifixion-watercolor
  • painting-yourself-at-cross
Last edited by Neil MacQueen

Trial and Crucifixion

Art Workshop

Summary of Lesson Activities:

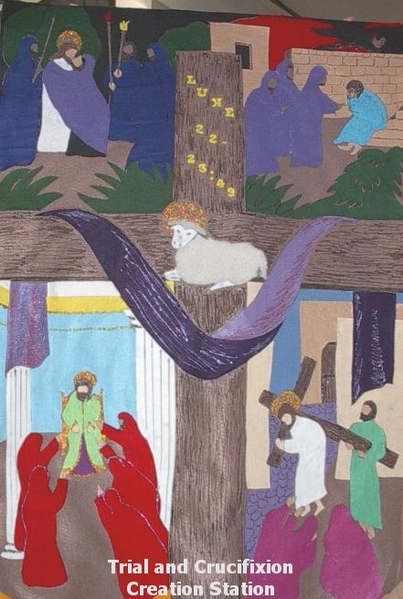
Children will create a banner depicting various scenes from Jesus' trial and crucifixion.

Scripture Reference:

Luke 22-23 with special emphasis on the crucifixion, betrayal, denial, trial, and carrying the cross. Each week will emphasize a different portion in the following order: crucifixion, Judas, Peter, trial, Simon of Cyrene.

Concepts:

  • Jesus suffered and died so that our souls can live forever.
  • Jesus is obedient to God.

Lesson Objectives:

  • Students will learn that Jesus’ last day was filled with suffering and sacrifice, just as God had foretold. Although other accounts vary, this lesson should be Luke’s story.
  • Students will think about God’s plan. Crucifixion was a very cruel form of punishment and they may question why he didn’t save himself. The children should be reminded that Jesus didn’t just die, but he rose from the dead on Easter.
  • The children will learn that Jesus in death became our protection just like the sacrificed lambs protected the Hebrew people in Moses’ time. As God’s son, he lived and died like all men. His death to save our souls was a gift from God to all of us.
  • The children will assemble a portion of a community banner that when complete will remind everyone of the sacrifice on Jesus’ last day.


CSTrialRotation


Leader Preparation:

  • Read the scripture passages and attend the Faith Quest Workshop Leaders Bible Study.
  • Prepare an opening prayer in case nobody volunteers to pray.
  • Prepare the basic banner. Draw in pencil, the images, background, etc. Cut out fabric pieces to create the image. Number each piece and its location. Keep the pieces for each square or picture separate. The children will glue the pieces onto the banner to creat the picture
  • Gather the Materials

Materials List:

  • Scissors (for first week only).
  • Cut wrapping paper sections to protect areas not being worked on - anchor with paper clips.
  • Felt and Liquid Stitch glue
  • Fabric pieces and banner


Lesson Plan

Opening:

Welcome the children and introduce yourself. Wear your name tag.

Start the “lesson time” with prayer. Ask for volunteers, but plan on praying yourself. A short prayer thanking God for being a part of our lives would be appropriate. Ask God to help us to be aware of God’s presence so that we may do good things as Jesus has taught us.

Dig:

Bible Story:

  1. Discuss the background to today’s story: Jesus has come to Jerusalem to celebrate Passover.
    In our last lesson we learned that God protected the Hebrew people from death by telling them to sacrifice a lamb (Unit lessons on Moses, the Plagues and Passover).
    At this Passover supper, Jesus tells his disciples that he will soon die and enter God’s kingdom and many other things that will also happen (22:16, 18, 21, 34, 37).
    After the meal, Jesus and his disciples went to the Mount of Olives to pray. While they were there, Judas came with some people and, according to plan, kissed Jesus so that they would know who he was and arrest him (22:4-6, 47-53).
    Soon after, Peter in confusion denied being a follower of Jesus three times before the cock crowed at sunrise, just as Jesus had predicted (22:31-34, 54-62).
    Jesus was questioned by priests and the rulers Pilate and Herod. Pilate and Herod did not want to kill Jesus, but some people were angry because they understood Jesus to say that he was the Son of God.
    At Jesus’ last supper he said that soon people would accuse him of being a criminal (22:37). They yelled for him to be crucified - die while nailed to a cross (22:66- 23:1-23). Jesus was made to carry the heavy wooden cross that he would be crucified on. He was probably very tired from being awake all night and suffering from being moved from one place to another and made fun of.
    Some soldiers saw that Jesus could not carry the cross alone and had a man named Simon of Cyrene help him. Simon was just happening by, but he did help Jesus.
    As he walked, Jesus was not bitter, but offered comfort to crying women along the road (23:26-28).
    Jesus was taken to a place called The Skull and nailed to the cross.
    Jesus said, “Father forgive these people! They don’t know what they are doing.”
    While Jesus hung from the cross, people made fun of him. Soldiers gambled for his clothes and criminals on nearby crosses insulted him, yet he forgave them all.
    Jesus’ followers watched sadly from a distance while he died (23:32-48).
    Jesus was like the sacrificed lamb at Passover - he died to save us.
  2. Spend a short amount of time on the scripture passages referenced above. Have the children use their Bibles to locate the story. Focus on the crucifixion the first week but briefly tell the background of the other events during his final day. During the second week, focus on the crucifixion and Judas’ part. Week three, focus on the crucifixion and Peter’s part. Week four, focus on the crucifixion and the trials. Week five, focus on the crucifixion and the carrying of the cross. Explain that Jesus is the perfect example of being completely obedient to God. He faced death calmly and with majesty.
  3. Take a minute to talk to the children about the creation they are going to be doing in this workshop. Tell them that they will be assembling a portion of a banner which will hang in the Great Hall and remind everyone of the sacrifice on Jesus’ last day.

Application:

  1. Have the children put on smocks. The glue is non-toxic but permanent when fully dry. It will wash off hands before totally dry. The glue should be thinly spread on the reverse side of each fabric piece (squeeze a thin line and spread with fingers) and then firmly and frequently press down in the marked location (pieces are keyed with letters of the alphabet marked on the reverse to match alphabet marked sections of the banner).
  2. Create! The completed banner will be 3’W x 4.5’ H. The cross with a lamb in the center, the scripture reference and a purple drape for sadness will go on the first week. Successive weeks will do the four corners: upper left - Judas’ kiss, upper right - Peter’s denial, lower left - the trial, lower right - carrying the cross.
  3. Show the children what the completed banner will look like and then make available the section materials they will be using. Using wrapping paper, mask the areas not being worked on during each week. In several places, the background will appear as one of the colors in the composition.
  4. Each week’s depiction can be treated as a puzzle to start. Have the children arrange the pieces of that week’s picture on the banner. Assign pieces to be glued on reverse side to one or two children (larger sections may even need three kids to spread glue thinly). All gluing should be done at a separate table and the pieces then carried back to the banner to be carefully and firmly pressed into place. Helpers should assist in aligning the felt. Try not to get glue in the front. Frequent pressing is necessary.
  5. The sequence of work is as follows: Week 1 - Cross with lamb and purple drape. Also, the Bible reference - Luke 22-23:49 should be cut out and applied where drawn, Week 2 - Kiss of Judas, Week 3 - Peter’s denial, Week 4 - Trial, Week 5 - Simon helps carry the cross.
  6. At the end of each week’s work, it would be best to leave the banner laying flat so that the glue can properly dry.
  7. Clean up! Involve all kids in this so that you will have time to share together in the closing.

Reflection:

Shepherds will pass out the journals and pencils/markers. The children should spend a few minutes reflecting upon the morning’s lesson – Right up until his death, Jesus did God’s work, instructing and preparing his disciples to teach God’s message, forgiving and comforting people, and pledging his spirit to God.

Encourage the children to share ideas about how Jesus knew of his coming crucifixion and how he was obedient to God.

Say the Memory Verse together (see above). You may want to have this verse printed on a banner and hung in the room, write it on the white board in the room, or have it on slips of paper that each child can take home with them.

Pray! Ask the kids if they have any prayer requests. Thank God for being with us.


A lesson written by Kirk from: Kildaire Presbyterian
Cary, NC

A representative of Rotation.org reformatted this post to improve readability.

Attachments

Images (1)
  • CSTrialRotation
Last edited by Luanne Payne

Easter – Trial and Crucifixion

Art Workshop


Summary of Lesson Activities:

Read Benjamin’s Box by Melody Carlson and decorate treasure boxes (cross boxes).

Scripture References:

Luke 22:47-23:56 


Leader Preparation:

  • Review background information and lesson materials.
  • Gather necessary supplies.
  • Write the memory verse on the board.
  • Make a copy of the list of “treasures” for children to take home with their box. 


Materials List:

  • Bibles For grades 1 & 2: Little Kids’ Adventure Bible, for grades 3 and up: Adventure Bible for Young Readers
  • * The book: Journey to the Cross
  • Treasure boxes (cardboard or papier mache cross boxes available from Oriental Trading catalog www.orientaltrading.com)
  • Decorating supplies- jewels, paint, glitter
  • Paintbrushes
  • Glue
  • Treasures from the story separated into a bag for each child
  • Straw wrapped in small bunches for the box
  • Horse or donkey fur
  • Coins
  • Pieces of a broken terra cotta pot or a ceramic cup
  • Small twigs
  • Small strips of leather
  • Thorns or pieces of a thorny plant
  • Nails
  • Dice
  • Cheesecloth cut into small pieces
  • Small rocks

Time guidelines:
Welcome and introductions 5 minutes
Bible Study 10 minutes
Reading “Benjamin’s Box” 15 minutes
Decorating the boxes 20 minutes
Journals/Closing 10 minutes


Lesson Plan


Openin
g:

Welcome the children and introduce yourself. Make sure each child is wearing a nametag. Give the children a simple one or two sentence synopsis of what you will be doing during the workshop. Tell them they will be talking about the trial and crucifixion of Jesus and will create a “treasure box” that will help remind them of the greatest treasure in their lives.

Opening Prayer: Dear Lord, Thank you for the world around us. Thank you for the new life that we see in the spring. As we read about the sacrifices you made for each of us, help us to recognize all of the blessings in our lives. Amen.

Dig:

Bible Study:

Adventure Bible for Young Readers: Luke 22:47-23:56, Little Kids’ Adventure Bible: pages 348-355. See paraphrased version below.

Each workshop begins with the Bible story. One of our primary goals is to improve the children’s Bible literacy! If children did not bring their Bibles from home, use the classroom Bibles. Shepherds should help the children locate the stories. Use the handout “Helping Children Learn to Use their Bibles” and the Background Information to help you introduce the story.

**Remember, that as the Rotation progresses, the children will become more familiar with the story. When this happens, allow the children to tell you what they know. The children should still locate the story in their Bibles every week. Use the bold headings in their Bibles to guide your discussion. Then you can fill in any missing information and add additional details using the Background Information. One of greatest advantages of this model is that children who come regularly learn the story in great depth.


In this particular workshop, we will be focusing on the highlights in Luke’s Gospel, and then reading Benjamin’s Box by Melody Carlson.


Have the children locate the beginning of the story in Luke 22:47-23:56 (page 348-355 in Little Kids’ Adventure Bible). 

Briefly review the story by looking over the headings in the Bible (in bold red and blue print for grades 1-2, in bold print for grades 3-6). 

You may want to use the information and outline below to help you paraphrase the main points of the story (plan to spend only about 10 minutes on this part of the lesson). Discuss the Bible notes as time allows. Add more details as the Rotation progresses.


Introduce the Story:
Ask: Where would we find a story about Jesus and his friends? (gospels in the New Testament). Today’s story is found in all four gospels. (Matthew, Mark, Luke and John). We are going to do our Bible study from the gospel of Luke.

I am going to tell you the story and you will find portions of it. We’ll also look at some of the Bible notes. First, let’s review a little bit and remember what has been happening to Jesus…

Jesus and his disciples left Jerusalem after raising Lazarus. Jesus knew that that had really angered the religious leaders. They were determined to find a way to kill him. But now it was time for the Passover, a very important Jewish festival. Jesus and his disciples came back to Jerusalem to worship at the Temple to celebrate the Passover. When Jesus rode into Jerusalem people waved palm branches and welcomed him. They shouted out Hosanna, and called him King! They were so excited. Then on Thursday night Jesus ate his last meal with his disciples. We call this the ______. (Last Supper). He knew this was his last night to be with them. After the meal, they went out to the Mount of Olives in the Garden of Gethsemane. Jesus needed to pray. He knew what was coming and he needed God’s strength and closeness. The disciples all fell asleep. Jesus had hoped they would stay awake and pray with him…
Suddenly, there were loud shouts and noises. A crowd of soldiers and people rushed up. Judas had betrayed Jesus for 30 pieces of silver. With a kiss, on Jesus’ cheek, Judas let the soldiers know who to arrest. The guards arrested Jesus and took him away to the house of the chief priest.

Let’s find the story in our Bibles now…

"Jesus is Taken to the Sanhedrin" (Grades 1-2: page 348, Grades 3-6: Luke 22:54)
The soldiers and crowd took Jesus away to the house of Caiaphas, the high priest and president of the Sanhedrin. Do you know what the Sanhedrin is?

Locate and read the "Did you Know" Bible note (Grades 1-2: page 348 and Grades 3-6: page 1159): What was the Sanhedrin?


The Sanhedrin was a very powerful Jewish court. They didn’t like Jesus and what he had been teaching. They had been looking for a way to get rid of Jesus since Lazarus was raised from the dead. They were more interested in following the rules that they made up, rather than really doing what God wanted. The Sanhedrin was very powerful, but the Romans were really in charge. As long as the Sanhedrin kept things peaceful and quiet, the Romans let them do their own thing. Caiaphas was the high priest and the president of the Sanhedrin. He was afraid that Jesus was getting people too riled up – all this talk about new Kings and all. Maybe the people would even riot. If that happened, the Romans would take over and take away the Sanhedrin’s power. Caiaphas thought it would be better for Jesus to die, since he was just one man. Then everything would get back to normal.

Grades 3-6 only: People in Bible Times: "Caiaphas" (page 1263),

Now the Sanhedrin was known throughout the world for their just laws. But this night, they broke many of their own laws! (Refer to the Background Information for the list of broken laws.)

Caiaphas asked Jesus a lot of questions. “If you are the Christ, tell us,” they said. Are you the Christ? Are you the Son of God?” Jesus said, “I am. And you will see the Son of Man sitting at the right hand of God.” This made Caiaphas and the Sanhedrin furious! “This is blasphemy! We have heard it from his own lips. This man is claiming to be God, himself. He must die!”

Locate and read the People in Bible Times note: "Jesus" (Grades 1-2: page 289, Grades 3-6: page 1176). Jesus called himself the Son of God and the Son of Man. This means that Jesus is both God and human.

The Sanhedrin was furious! They spit on Jesus and hit him. They found Jesus guilty and said that he must die. But, remember, the Sanhedrin was very powerful, but they didn’t have the power to put anyone to death.

"Peter Says He Does Not Know Jesus" (Grades 1-2: page 349, Grades 3-6: page 1230)
Meanwhile Peter, Jesus’ disciple, was outside in the courtyard. A woman saw Peter and recognized him as one of Jesus’ followers. But Peter was afraid. He said three times that he didn’t know Jesus. Just as he said it the last time, a rooster crowed. At that very moment, Jesus turned and looked right at Peter. Jesus had told Peter that he would deny him three times before the rooster crowed. Peter felt terrible and cried and cried.

Grades 3-6: "The Guards make Fun of Jesus" (page 1231)
The guards made fun of Jesus. They laughed at him and hit him. They put a blindfold on his eyes and said, “Prophesy and tell who hit you.”

"Jesus Goes Before Pilate" (and Herod) (Grades 1-2: page 350, Grades 3-6: page 1231)
Early the next morning, the priests took Jesus to Pilate, the Roman governor. The Sanhedrin could arrest people and punish them, but only the Roman governor could sentence someone to be killed. They wanted Jesus put to death.

Read the People in Bible Times Note: "Pontius Pilate" (Grades 1-2: page 351, Grades 3-6: page 1160)

Pilate asked Jesus lots of questions too. He thought Jesus was innocent. He wanted the Sanhedrin to deal with Jesus on its own. Pilate discovered that Jesus was from Galilee, a different province than here in Jerusalem. So he sent Jesus to see Herod, who was the leader of Galilee. Herod was in town because of the Passover. Herod was excited to see Jesus. He hoped he would do some miracles for him. Herod asked Jesus many questions, but Jesus didn’t answer him. So Herod and his soldiers laughed at Jesus and made fun of him. They put a purple robe on him and laughed at the “king.” Then Herod sent Jesus back to Pilate. Pilate didn’t believe Jesus should die. He wanted to just whip him and let him go. But the Sanhedrin wanted Jesus killed and, remember, they could not do that. They kept after Pilate. Pilate offered to let Jesus go free, since the Romans always let a Jewish prisoner go free during Passover. But the priests and crowd asked Pilate to release a criminal named Barabbas instead. They wanted Jesus to die. The crowd screamed, “Crucify him! Crucify him!” Finally Pilate gave in. He ordered Jesus whipped and crucified.

Read the Life in Bible Times note: "Flogging" (Grades 1-2: page 352, “Whipping” Grades 3-6: page 1188)

Read the Life in Bible Times note: "The Cross" (Grades 1-2: pages 352-353, Grades 3-6: pages 1188 and 1232).

Grades 3-6 can also read People in Bible Times: "Simon" (page 1232) Explain that Simon would have carried just the horizontal cross piece of Jesus’ cross, not the entire cross as we typically see in pictures. The older children will probably be interested in more of the details of crucifixions. Use the background information to discuss with them.

"Jesus is Nailed to a Cross" (Grades 1-2: page 352, Grades 3-6: page 1232)

They took Jesus away to the place called Golgotha. It means “the skull.” They nailed his wrists and feet to the cross and left him there to die. The soldiers stood guard and made fun of Jesus. They put a sign above his head that read, “This is the King of the Jews.” They cast lots to see who would get to keep Jesus’ robe. (this is kind of like playing a game with dice) Jesus prayed, “Father forgive them. They don’t know what they are doing.” Two criminals were crucified on both sides of Jesus. One of them asked Jesus to remember him in heaven. Jesus promised that the man would be in heaven with Jesus that very day.

 * "Jesus Dies" (Grades 1-2: page 354, Grades 3-6: page 1232) (there is good background information in Journey to the Cross about this section - you might want to have it out for the children to see)

At noon the sky turned dark. It lasted until 3:00. At 3:00 Jesus cried out,”Father, into your hands I commit my very life.” Then he died. Immediately the earth shook and the curtain in the Temple tore from top to bottom. The Roman commander standing in front of Jesus heard Jesus and saw what happened. He said, “Surely this man did what was right!”

"Jesus is Buried" (Grades 1-2: page 354, Grades 3-6: page 1189)
Joseph of Arimathea, a secret disciple of Jesus, went to Pilate and asked for Jesus’ body. Joseph wrapped Jesus’ body in linen and put him in a new tomb.

Grades 3-6: People in Bible Times: "Joseph of Arimathea" (page 1189)

Read the Life in Bible Times note: "Burial" (Grades 1-2: page 355, Grades 3-6: page 1265). (This should be review for our children as we have discussed Jewish burial customs in great length during the Jairus’ Daughter rotation and the Raising of Lazarus rotation)

Read the Life in Bible Times note: "Jesus’ Tomb" (Grades 1-2: page 356, Grades 3-6: page 1162).

Jesus’ friends and disciples and family watched all of this. What do you think they were thinking when they saw that Jesus had really died? How do you think they were feeling? How would you have felt if you had watched Jesus die and seen him buried?

But we know that this is not the end of the story… because three days later, what happened? We know that Jesus rose from the dead and is alive today! And that is what we celebrate at Easter!

Memory verse: During each rotation, the children will memorize one scripture verse. Locate and review the memory verse at this time.

Read story: Benjamin’s Box

Give each child a cross box (place a small bunch of straw inside) and a bag of treasures.
As you read the story, have the children place each item in the box as Benjamin did.

When you read the last page, have the children bow their heads in prayer, “Dear God, thank you for letting me find all these special treasures. But most of all, I thank you for sending me the greatest treasure of all. Thank you for sending Jesus. And help me to be a good servant for Jesus. Help me to tell everyone I know about the good news! Amen.”

Activity: Decorating the Treasure Box

Have the children write their names on the bottoms of their boxes before beginning to decorate.

As children are decorating their boxes, discuss questions from the Background Information - "Meaning of the Cross - FAQs" and "Definitions and People to Know."

Reflection:

The last 10 minutes should be reserved for Journal Reflection time. This is an opportunity for processing and reflection about what the children have learned. Ask the shepherds to pass out the journals and pencils/pens and the journal question sticker for the day. Workshop leaders and shepherds should sit down with children in small groups to facilitate discussion and writing in Faith Journals. Memory verse stickers are also included for each lesson. Children may copy the memory verse and illustrate it as an alternative to journal questions.

Journal Questions:
Grades 1-2: Draw a picture of some of the treasures you placed in your box. Who will you show these treasures to this week?
Grades 3-6: In today’s story, Benjamin learned that Jesus is the real treasure! How will you share the treasure of Jesus with others during this Easter season?

Closing Prayer: Gather the children together in a circle. Review with them one word or concept that they learned during today’s session. (Believe, Love, Resurrection, Treasure are some suggestions) Encourage children to come back next week for another workshop, and to invite their friends, especially their friends who do not belong to a church. Remind them to bring their Bibles. Ask for prayer requests and pray together.

Ask one of the children to read the prayer from Benjamin’s Box as the closing prayer.


 Sources:

  • Carlson, Melody. Benjamin’s Box. Zonderkidz Publishing, 1997, 9780310715054.
  • Haidle, Helen. Journey to the Cross. Zonderkidz, 2001. (9780310700234 - out of print) 

A lesson written by Jaymie Derden from State Street UMC
Bristol, VA

2003. Permission granted for non-commercial, local church use, provided credit is give to the source. 

A representative of Rotation.org reformatted this post to improve readability.

Last edited by Rotation.org Lesson Forma-teer

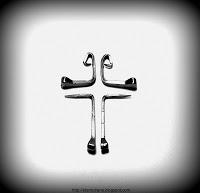
Cross pendant, Cross necklace Project

There are many variations of this project on the web. I looked at a lot of video and how-to's and settled on this one. Here's one of the better video demonstrations. https://www.youtube.com/watch?v=r1N8cnA5Z6Q

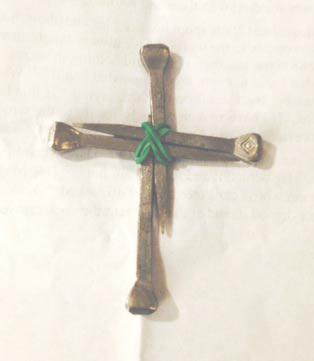
I did the following "Nail Bending and wrapping" cross project with my youth before trying it with my kids. Glad I did!  The bending of the nails was challenging to them, as was trying to keep the four pieces from sliding around, despite the rubber bands. The finished product has some neat aspects to it, but I wouldn't do it with youth or kids again without pre-bending the nails.

In fact, see the next post in this topic for my "no bend" version, and my "lesson liturgy" in the next post after that where I combine the creation of the necklace with scripture from Mark's story of the Crucifixion.

Here's a photo of how my cross turned out.

cross0

BELOW this post -in the next post, -is my MODIFIED "No Nail Bending" version of the project. By so not wasting so much time on bending nails, we were able to avoid nail injuries and spend time on decorating them, and then making a second one to give away.

For those who want to bend the nails...here's a good tutorial. Getting them bent just right takes time and hand strength. I'd recommend the "no bend" version in the next post.

This youtube video link should be good for many years. If it disappears, you can find similar horseshoe nail bending videos. One of the reasons I like this guy's video is he clearly shows how to hold the nails together and how to wrap the wire.

paracord-crosz


Neil Comments:


He is using "#5" horseshoe nails. Less than $15 for 100 on Amazon. Craft wire and/or paracord also available there. Michael's Crafts also has plenty of wire and cord in their craft jewelry section.

-These are 'craft' quality nails, not for real horse-shoeing

The aluminum craft wire he's using is about 22 gauge. I bought a 12 pack of 22 gauge in multi-colors for about $14.

Unlike he shows in the video, do not cut the wire off the spool until you're done wrapping with it. Holding the spool makes it easier to get a nice TIGHT WIND around the nails.

Alternately, you can wrap your cross with rawhide or thin nylon. Don't forget to superglue the cord at key points after wrapping to hold it to the cross.

Use "paracord" (braided nylon --like lanyard cord) or rawhide for the necklace.

Tip:
Substitute "super glue" for "varnish" at the end of the project. This will secure the wire and dry fast so students can take home at end of class.

cross1

BIG TIP: If you're bending your own nails, make sure you pre-measure where to put the bends in the nails and are consistent about it. Get the angles right too.  If your bending is a little off, it makes the cross "whooper jawed" and harder to hold together when wrapping.

cross2

Attachments

Images (6)
  • nail-crosz2
  • cross1
  • cross2
  • cross3
  • paracord-crosz
  • cross0
Last edited by Neil MacQueen

Nail Cross 2: The "No Nail Bending" Version

Update: See my "lesson liturgy" in the next post after this one where I combine the creation of the necklace with scripture from Mark's story of the Crucifixion.

As mentioned above, bending the nails takes some strength and precision, and takes a little more time than I wanted to take.  My "no bend" version is easier to set up and wrap with wire, and leaves more time to make additional crosses that kids can give to others.

How to:

In the "no bend" version below, I used four straight horseshoe nails (#5). They are about about 2.5 inches long.

1. Prior to class, super-glue the nails to each other and then reinforce the middle 'joint' of the cross with a rubber band. This was an important improvement for us as you do apply quite a bit of force on the cross nails as you are wrapping the wire. The glue and rubberband is merely a temporary way to hold the nails together while you wrap. Once they are wrapped, the wire makes the cross very sturdy.  I would suggest gluing in advance of class.

Starting out, here's how it will look..

cross1


2. Think about which colors of wire or cord you want to include on your cross.  If you are going to wrap the cross in rawhide or cord, I would still recommend binding the two cross pieces with a bit of wire.

Think about how far to each edge you want to wrap. For example, you could wrap all the way covering the nails, or you could just wrap the center, leaving the tips of the nails somewhat (and safely) exposed so that their "nail-ness" is more apparent.

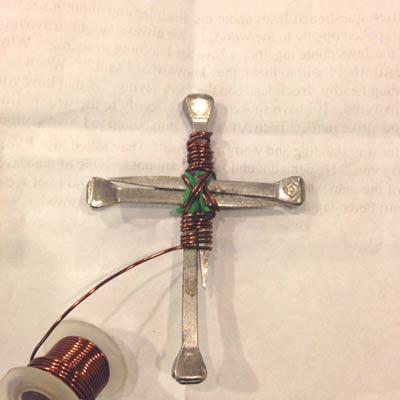
3. Start with one piece of wire, as you wrap around the nail, you'll wrap over the loose end of wire you started with, in effect, pinning it underneath your wire wrap. (Doing this is more obvious when you actually start!)  When you want to change colors, cut the wire and start wrapping with the new color over the old end. After the cross is complete, you can add a dab of super glue to hold the ends down. Glue is especially helpful if the kids didn't wrap the wire so tightly.

TIP: Because we had used very small "craft" rubber bands, we simply wrapped the wire right over them. In the "nail bending" version of this project, you are instructed to cut the rubber bands off the nails as you wrap. In my finished version below, you can see a bit of the small green rubber band underneath the wire.

TIP: Don't cut the wire off of the spool until you're done wrapping with it. The spool makes it easier to get a nice TIGHT WIND around the nails.

cross2

4. Create a wire loop at the top for the lanyard. When wrapping wire on the TOP of the cross, create a loop by twisting the wire a bit so that you have an 'eye' look at the top of the cross for your lanyard to go through. Continue wrapping your wire with the loop around the nail. Pretty simple once you try it.

5. Finish by tucking in any loose wire ends and adding a dab of super glue to make them stay put. Add a lanyard.   You can get a spool of craft cord or rawhide at the craft store.

Finished product:

Nail-Cross-Necklace-Rotation.org

Options:

Wrap the cross with rawhide or colorful but thin nylon bracelet or "paracord."  If you use cord instead of wire, you will DEFINITELY want to add some dabs of Super Glue to hold the cord to the nails at strategic points because the cord doesn't wrap as tightly around the nails and doesn't help hold the nails together quite as tightly (without the extra dabs of glue).

Attachments

Images (4)
  • cross3
  • cross1
  • cross2
  • Nail-Cross-Necklace-Rotation.org
Last edited by Neil MacQueen

Nail Cross-Making Art Project & Lesson "Liturgy"

This lesson plan blends the reading of the story of Christ's Crucifixion according to Mark with the creation of a Cross Necklace.  I hope you like it.
Preparation and plenty of helpful hands is the key to making this work in a short amount of time.

The readings and cross-making takes about 30 minutes, so plan accordingly.  Be sure to the the "how to" posts above this one at https://www.rotation.org/topic...8#441810505984420988 for some important tips, especially those about assembling the nails together with glue and a rubber band or wire ahead of time so that small hands don't struggle holding the four nails together as they wrap them with colored wire.

Below are the four scripture readings to be read at various stages of the necklace-making process. I have edited a couple of lines for the sake of clarity and brevity.

Assign "readers" parts.

Distribute the specified materials after each reading.

Feel free to offer comments or ask simple follow-up questions as students get into wrapping their nails crosses with the wire.

Reading 1: Mark 15: 1-5 “The Arrest and Trial of Jesus”

READER: Mark 15, verses 1 through 5. After they had arrested Jesus, the chief priests, teachers of the Law, and the whole Council met early on Friday morning to make their case against Jesus. Then they bound Jesus and led him to Pilate the Roman Governor for trial. “Are you the king of the Jews?” Pilate asked. “So you say,” replied Jesus. The chief priests then accused Jesus of many things, but Jesus refused to say a word, and Pilate was amazed

DISTRIBUTE the wire symbolizing the arrest and binding of Jesus.

Reading 2: Mark 15: 16-20 “Mocked and Beaten”

READER: Mark 15: 16-20 -- Then the soldiers put a purple robe and crown of thorns on Jesus. “Long live the King of the Jews!” they saluted. They struck Jesus and spat on Him and mockingly bowed down to him. And then they led Jesus out to be crucified.

CHILD: Why were they so mean to Jesus, and why didn’t Jesus ask God to rescue him so that he didn’t have to suffer and die?

READER:  When we sin, it hurts others and makes fun of God. Our sins say, “I mock you, God, --and all your rules and silly talk about love and forgiveness.” Sin is like taking the love of God and nailing it to a cross.

DISTRIBUTE the nail crosses ready for wrapping with wire. As you distribute the nail crosses, continue with Reading 3...

Reading 3: Mark 15: 21-32 "Jesus is taken to Golgotha"

READER: Mark 15, verse 21 through 32. They took Jesus to a place called Golgotha, which means “The Place of the Skull.” It was nine o'clock in the morning when they crucified Jesus (by nailing him to the cross). They placed a sign over his head announcing his crime. It read: “The King of the Jews.” The soldiers threw dice to divide up his clothing. And next to him they crucified two bandits. People passing by shook their heads and hurled insults at Jesus: “Aha! You said you could tear down and rebuild the Temple in three days. Why then don’t you save yourself and come down from the cross!” The religious authorities also made fun of Jesus, saying to one another, “He saved others, but he cannot save himself!”

CHILD: Why were people so mean to Jesus?   And I wonder how we are still "mean" to him today?

CONTINUE finishing the cross necklace.

Reading 4:  Mark 15: 33-41 -- To be read after the crosses are made, but before students wear them.

READER: Mark 15, verses 33 through 41. At noon darkness covered the land. And then at three o'clock Jesus cried out with a loud shout, “Eloi, Eloi, lema sabachthani?” which means, “My God, my God, why did you abandon me?” Then Jesus gave a loud cry and breathed his last. And the curtain of the temple was torn in two, from top to bottom. And when the Roman soldier standing near Jesus saw how Jesus had died, he said, “Truly this man was God’s Son!”

DISTRIBUTE a length of necklace string to each person.

A CHILD: Today, I will wear the cross of Jesus because like the Roman soldier that day, I truly believe he was and is God's Son. Who else will wear their cross as a sign of their faith?

INVITE all those who wish to --to wear their cross necklace. If they would prefer putting it in their pocket, or sharing it with someone else, tell them that is okay too. God sees what is in our heart. Amen!

Review the three parts of the story and necklace:

  1. Wire binding to remember his arrest and scourging
  2. Nails to remember how they killed him and insulted him.
  3. A necklace string to symbolize our decision to show we believe in him and are thankful for his sacrifice for our sins.
Last edited by Luanne Payne

Nail Cross Pendants or Magnetic Craft Stick Crosses:
Posted by member Lerner

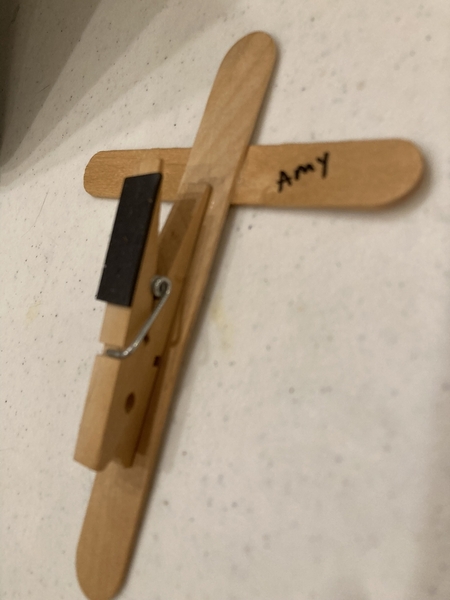
Students can make either nail cross pendants as shown above, or make craft stick crosses mounted on a clothespin clip with magnetic backing.

Nail Crosses:

We used horseshoe nails for the crosses, a hot-glue gun to pre-glue them, and copper wire to wind them. Each member of cross (the crossbar and upright) is made out of two nails with a pointy end matched to a blunt end on each point of the cross to avoid having a sharp object dangling around a student's neck!

This is probably best for the 4th-6th grade group because some manual dexterity and strength is required to wire the nails together. We needed to pre-glue the nails together using a hot glue gun, and then the kids wired them and attached them to the necklace cord.

Craft stick crosses:

Younger children made decorated craft stick crosses mounted on clip clothespins. For these you will need craft sticks, sequins and glitter, white glue, clothespins, and stick-on magnets. These clips might be a good place to hang the rotation memory verses to learn at home!

craft.stick.cross.constructioncraft.stick.cross

You may want to cut the craft sticks (cut and file on sand paper – a good student activity?) so that the crosspiece is slightly shorter than the upright piece. Or use two different sizes of clothespins. The sticks are simply glued in a cross shape on the clothespin. Add the magnetic backing, and decorate the cross. Students might want to make additional ones as gifts.

If time is short, glue the sticks and the clothespins together in advance with tacky glue or a glue gun.

REFLECTION QUESTIONS ABOUT THE NAILS  AND THE CROSS:
(added by editor)

Nails are sharp objects, obviously, which can be used for good or bad. They can represent things we do well ("Nailed it!"), or things we did bad ("I got nailed").

Look at the nail cross you've made.
What did Jesus "nail" while on earth? (get right)
What got him in trouble? (nailed him)

What else did they use nails for in the story? (Nailing the sign)
What did the sign read? (King of the Jews)
God could have called us to pay for our sins. Instead, he nailed a sign for us to see. What was on OUR sign from God? Jesus!

What was God trying to tell us by allowing Jesus and his message to be "nailed" to the heart of history?

You might end your art project by creating messages which you can NAIL to a wooden cross. What 'sign' would YOU nail above Jesus?

Attachments

Images (2)
  • craft.stick.cross.construction
  • craft.stick.cross
Last edited by Amy Crane

Some inspiration for other "Cross, Crucifixion" art projects

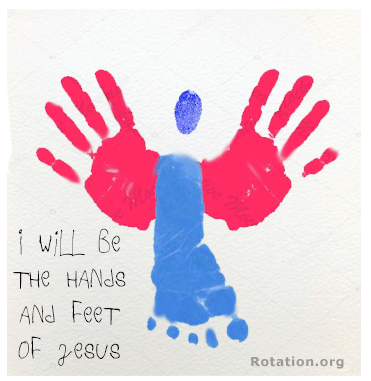
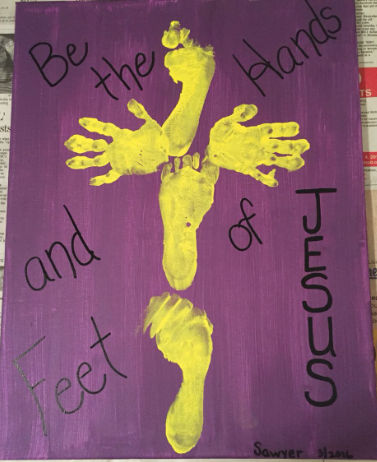
Jesus' Hands and Feet (our hands, feet, and thumbprint)

hands-feet-Jesus-cross


What would it have been like to be at the "foot" of the cross with Jesus?
What would you have heard, seen, been upset about, said to others?

hands-feet-cross


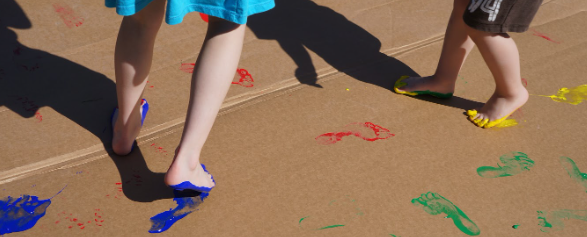
A FOOTPRINTS PAINTING

Reasons people walked on by Jesus on the Cross

Students first study and write "reasons" people ignore, reject, mock, don't follow Jesus, "walk on by" like those who did so at the Crucifixion of Jesus.   Some foot prints go next to the reasons.

Some footprints can lead up to the cross to thank Jesus, and others can lead away from the cross promising to follow his humble, forgiving example.

Footsteps-at-foot-of-cross

Matthew 27:39 Those who passed by derided him, shaking their heads 40 and saying, “You who would destroy the temple and build it in three days, save yourself! If you are the Son of God, come down from the cross.” 41 In the same way the chief priests also, along with the scribes and elders, were mocking him, saying, 42 “He saved others; he cannot save himself. He is the King of Israel; let him come down from the cross now, and we will believe in him. 43 He trusts in God; let God deliver him now, if he wants to, for he said, ‘I am God’s Son.’ ” 44 The rebels who were crucified with him also taunted him in the same way.


Attachments

Images (3)
  • hands-feet-Jesus-cross
  • hands-feet-cross
  • Footsteps-at-foot-of-cross

Give us Barrabas!
Pilate lets Barabbas go Free
An Art Project Idea

Mark 15:1-15   

In our Teachers Lounge some time ago, members Pat Thompson and Neil MacQueen discussed an art idea for teaching about and reflecting on the story of Barrabas in Mark 15. It was along the lines of "the things we want vs the things/person we really need" in our lives.

Here's an excerpt of their discussion:


The thing that really stands out in this story is the crowd chanting "GIVE US" and in this case, "BARRABAS." The crowd was so easily led into wanting something other than Jesus.  (If that's not a life application from the story, I don't know what is!)

It reminds me of the other times Jesus was asked to "give," -- like in the Temptation in the Wilderness where he was asked to give up his worship of God, and when the Pharisees "demanded" a miracle (Matt 16:1). These are good reminder that people sometimes ask Jesus for the wrong things.

The Question: What or who do we think we need to be given instead of Jesus?

To me, that sounds like the perfect MAGAZINE COLLAGE PROJECT.... items of "desire" torn from magazines, none of which are the things Jesus wants to give us, but they are all "Barrabbas" -- the things we want, instead of Jesus.

Give us money!
Give us good looks!
Give us fame!
Give us a popular leader! (one who promises much but will give us little)
Give me a nice car!
Give me a better job!
Give me a good grade on this test!
Give me nice clothes and a bigger house!
Give me power!
Give me a powerful Messiah who will act like I want them to!
Give me my presidential candidate!
Give me all knowledge and the faith to move mountains! (uh-oh, Paul says that's those things are no good without love)

By contrast, what does Jesus want to give us and others?
That could be "the other half" of the collage.  Might be hard to find in the pages of many magazines, so maybe it could be a WORD CLOUD using letters and words torn from the magazines. GIVE Love, Forgiveness, Unselfishness, GIVE HELP, GIVE KINDNESS, GIVE MERCY, etc. Or these could be drawn.  Or you could print a Jesus illustration and have the kids create a "talk bubble" over his head and fill it with what they think Jesus wants to give us, compared to people shouting for Barrabas and the list of things people think they need (other than Jesus and his values).

If I thought about it more, I might have the kids put the "GIVE ME Give Us Barrabas" items on one half of the posterboard toward the bottom in the shape of the Hill of Golgotha, and continue with the "give me" things to make the shape of a cross.

The other half of the posterboard would be things God wants to give us (his love, his son, his commandments, his forgiveness, his guidance). These would be harder to visualize so I might let the kids DRAW some of these.

Add Reply

Post a New Topic
Lesson or Resource
Rotation.org Inc. is a volunteer-run, 100% member supported, 501(c)3 non-profit Sunday School lesson ministry. You are welcome to borrow and adapt content for non-commercial teaching purposes --as long as both the site and author are referenced. Rotation.org Inc reserves the right to manage, move, condense, delete, and otherwise improve all content posted to the site. Read our Terms of Service. Get a free Registered Membership or become a Supporting Member for full access to all site resources.
Rotation.org is rated 5 stars on Google based on 51 reviews. Serving a global community including the United States, Canada, United Kingdom, Australia, New Zealand, S. Africa, and more!
×
×
×
×
Link copied to your clipboard.
×
×