Art Lessons, Ideas, Activities, and Resources for Teaching David and Goliath in Sunday School.

Post your Sunday School ART lessons, ideas, activities, and resources for David and Goliath here.

  • Please include a scripture reference, supply lists, sources, suggested age range. age modification, etc.
  • Photos are much appreciated!  Click "attachments" and upload to your post.
  • Please be careful not to post copyrighted materials. Excerpting and paraphrasing is okay. Include attribution.
David and Goliath, Harp, Philistines, Armor, 1 Samuel 17, etc.

Bible lessons about David and Goliath -with Art, craft, painting, construction, drawing, etc.

Last edited by Luanne Payne
Original Post

Replies sorted oldest to newest


David & Goliath

Art Lesson


Summary of Lesson Activities: 

"Illustrating a David and Goliath Moment in Our Lives" includes a clothespin doll.


Scripture Reference:

1 Samuel 17

Lesson Objectives:

  • The goal of this lesson is for the children to know the story of David & Goliath and to understand that David was successful because he put his trust in God.


Supplies List:

  • Bibles
  • wooden clothespins
  • fabric scraps
  • fabric glue
  • yarn
  • markers
  • paper
  • crayons
  • colored pencils

Leader Preparation:

  • Read the background and scripture.
  • Gather the materials.


Presentation


Opening-Welcome and Lesson Activities:

Welcome the children to the art workshop. Explain that today they will be exploring the story of David & Goliath. Ask the children if anyone is familiar with that story. Pass out Bibles and have the children find the first book of Samuel. During the first week, instruct the children to turn to chapter 17, verse 1 and read the story of David & Goliath through verse 50 out loud. The children may take turns reading or you may read to them. In subsequent weeks, allow the children to summarize the story, referring to the Bible if need be. Use the Children's Bible for younger children.


Dig-Main Content and Reflection:

Explain to the children that they are going to do an art activity that will allow them to illustrate a “David & Goliath” situation that they faced in their own lives. Have the children begin by making a clothespin doll to represent themselves. Help the children to decorate their dolls using fabric, yarn, and markers.

When they have finished their dolls, set them aside and ask the children to think of a time when they were facing a giant problem as David did. (Provide many examples to stoke the conversation. Bullying comes to mind. Dealing with a divorce, or a death in the family. A friend that betrays you. Something you wish you hadn't done.)   Write out some of the problems/giants kids face in their lives with friends, family, health, self, etc. 


Ask:  How could their faith in God and God's guidance have helped them face their giant?  Ask the students to speak on God's behalf with advice to each student's "giant" problem. 


NOW.....Using the materials at hand, have the children produce a representation of that problem they faced. For example, if they have a giant problem with a friend, they could make a representation of that friend as a clothespin doll. If they 'hate' someone, or have a hard time getting along with someone, they could make a hard dark ball with (fake) spikes sticking out of it representing the pain they feel when they deal with that person.  It's not important that YOU know what the object represents, but only that THEY know what it represents. It can be 'abstract'. It will go home with them, along with their clothespin doll.


Allow this to take a few minutes, then pile those giant problems on the table, ask the students to offer "God's Advice" about all these problems...what to do about them.  


Now produce a bunch of red felt HEARTS and invite students to glue that heart BOTH on their doll or on their problem. Tell them that this heart represents the heart that God saw in David which enabled David to overcome his giant problems.  It was the heart of goodness and faith. Glue a heart on both your problem object and your clothespin object.


Next...Have everyone lay their hands on the pile of problems and lead a prayer over them for God's guidance. Let the objects go home in student pockets as a reminder.


Alternately, you can have the children take a large piece of paper that has been divided into two segments. On the left-hand side, have them draw their problem as it originally appeared. On the right-hand side, have the children draw what their problems looked like after they put their faith in God.

If time allows, let the children share their drawings and discuss how they put their faith in God. Ask the children to think of some additional times when it would be helpful to turn to God with their problems.

Keep the drawings to display, but allow the children to take their clothespin dolls home with them at the end of the lesson.


Alternate Game Ending:  (provided by Rotation Editor)


While the doll and "problem" object glue is drying, play this little game to reinforce the concept of "how you get a heart like David's"


Place a set of boxes or buckets about 10 feet from a line on the floor. Students stand at that line and aim a beanbag at the various boxes/buckets.


The boxes are marked, "Get Closer to God through Prayer", "Strengthen Your Faith through Worship",  "Have a Heart by Helping Others", "Learn God's Advice for Living by Reading Your Bible".    Inside each box are "heart" candy or felt hearts they can collect as they get a bag into the box.  


Mark one of the boxes with "???".  If they get a bag into that box they must come up with a "way to get closer to God".


Closing:


Have the children assist with the cleanup and end with a prayer.


A lesson posted by rotation.org stdavidskids.


A representative of Rotation.org reformatted this post to improve readability.


Last edited by Rotation.org Lesson Forma-teer

Originally posted by member LDM


David & Goliath: Art Idea


Between Michelangelo and Bernini, there is so much great sculpture associated with the Bible character of young David that it seemed like an obvious activity to try with the kids.

Materials used:

  • plasticine/plastic clay
  • floral wire (18 gauge x 18" straight wires in pkg from Walmart)
  • wire cutters
  • printouts or art book plates of Michelangelo's and Bernini's David.


The basic idea:
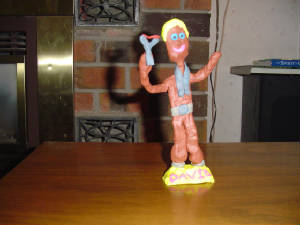
Bend one wire in half. Twist top section around itself to form head. Cut a 2nd wire to about 6 - 8 inches. Twist it around midsection for arms. Stick feet into good sized blob of plasticine to form solid base for sculpture.

Have the kids form basic human shape with wire and fill in around wire 'skeleton' with plasticine. The idea here is to reinforce the story by getting them to translate character traits of young David into human form thru sculpture.

To see a 9 yr old's rendering of David in wire and clay, click this link and look for photo #1:

DAVID PIC ON LD'S PHOTO PAGE


Here are a few questions:


  • Name some king-like traits of young David.
  • Name some people you know of that have these traits.
  • What are the "giants" that you or those people have faced in their life?
  • When the going gets tough, where does your courage or confidence or 'faith' come from?
  • David faced his giant more or less alone. Are we always alone facing our giants. Name some people in your support circle.


Last edited by Rotation.org Lesson Forma-teer

David and Goliath

Art Workshop ("Creation Station")

Summary of Lesson Activity:

Students will be making decorated rock paperweights to remind them of David's real power...   his choice to come out against the giant with his faith.

Scripture Reference:

1 Samuel 17:1-50

Key Scripture Verses:

1 Samuel 17:45- 46a “You’ve come out to fight me with a sword and a spear and a dagger. But I’ve come to fight you in the name of the Lord All-Powerful. He is the God of Israel’s army, and you have insulted him too. Today the Lord will help me defeat you.” (Contemporary English Version)

Memory Verse:
“Don’t ever be afraid or discouraged! I am the Lord your God, and I will be there to help you wherever you go.” Joshua 1:9 (CEV)

Concepts:

  • God is with you in difficult situations.
  • God gives us hope even when everything seems hopeless.
  • God works in ways we do not expect and through people we do not expect.

Lesson Objectives:

  1. Learn that David relied on God’s power and his own simple but skilled ability rather than fancy weapons and armor to win the battle for God’s people.
  2. Understand that even a child can do God’s work.
  3. Know that David had enough faith in God to bravely face the giant Goliath.
  4. Children will use acrylic paint to decorate stone paperweights to remind them of David’s deeds.

Materials List:

  • 2" to 4” smooth stones (these can be purchased in a home store, or from a local landscaper)
  • Pencils
  • Thin paintbrushes
  • Cups of water to rinse brushes
  • Liquid acrylic paint
  • Nontoxic, fumeless paint markers “Painters”
  • Paper towels

Leader Preparation:

  • Read the scripture ahead of time.
  • Gather the materials
  • Go over the project.


Presentation:

Opening- Welcome and Introductions:

Welcome the children and introduce yourself. Wear your nametag.

Start the “lesson time” with prayer. Ask for volunteers, but plan on praying yourself. A short prayer thanking Jesus for being a part of our lives always would be appropriate.

Dig-Main Content  and Reflection:

Bible Story:

David was a young boy who cared for his father’s sheep. Being a shepherd in his desert land was sometimes easy, but other times it was very dangerous. Wild animals like lions or bears try to eat the sheep. David would beat off the animal and, if it attacked, he would have to kill it. David learned to use a sling made of a piece of leather with a cord on each side. He would put a stone in the leather and twirl the sling by the strings. When he let go of one cord, the stone flew out.


David lived 3000 years ago in the town of Bethlehem in Israel. The Israelites who worshipped God were under attack by a tribe called the Philistines. One day David’s father asked David to take some food to his older brothers who were helping King Saul defend the Israelites from the Philistines. When he reached the battlefield, he discovered that a very large Philistine named Goliath had shouted out that he was the best soldier in his army and the Israelites should send their best soldier to fight him. Whoever won the battle, would win the war for his army.

Everyone was so frightened that they couldn’t do a thing. Then David told King Saul that he wanted to fight the giant. King Saul first said that David was too young. Then he tried to protect David with military clothes and armor to protect him when he fought Goliath. David did not feel right dressed like that. He took them off and with his shepherd’s staff in his hand collected five smooth stones from a nearby stream. Then he walked toward Goliath, putting one stone in the leather sling.

Goliath laughed when he saw the shepherd boy coming toward him. David said: “You’ve come out to fight me with a sword and a spear and a dagger. But I’ve come to fight you in the name of the Lord All-Powerful. He is the God of Israel’s army, and you have insulted him too. Today the Lord will help me defeat you.” Then David used his sling to throw one stone at the giant’s head, killing him. David the shepherd boy from Bethlehem had won the battle for the people of God.

Lesson Activity:

Create! Take a minute to talk to the children about the creation they are going to be doing in this workshop. Tell them that they will be painting the top side of a stone paperweight with a picture to remind them of David’s bravery.

David and Goliath art project in progress

What are some things you remember about David’s story? Brainstorm ideas, symbols, and scenes they remember about the story. What are some of the objects in the story? Tell them to choose one scene or symbol (shepherd’s crook, sling) of David to paint on the upper side of a stone. A background may be painted.

Steps: Have children put on smocks. Give each child a stone and a pencil. Tell them to lightly sketch their design on the stone. Have paint pens and thin brushes and disposable plates with small amounts of acrylic paint ready to place on each table for children to share. Cups of water should be used to wash brushes when changing colors. Tell the children to depress the shaken pens until the paint flows. Painting is best when colors are applied side by side, not atop each other. The paint pen color can be applied as lines or dots rather than solid areas. Have the children initial their stone when their picture is finished and place them off to the side on individual paper towels.

Clean up! The paint will wash off hands before it dries. Involve everyone in cleaning up so that you will have time to share together in the closing. You may want to have a prearranged signal for clean up and tell them at beginning of art project what that will be - perhaps giving them a 5 minute warning and then the final clean up notice to allow those who need a bit more warning that they need to complete whatever they are working on.

Reflection Time:

Ask the shepherds to pass out Journals and pencils/markers. The children should spend a few minutes reflecting upon the morning's lesson – Who was David? Even though he was probably afraid, what made him brave? David proved that God was at a child’s side to do a good thing. Can you think of some things you can do to please God?

Closing:

Encourage the children to think about how God helps us when everything seems hopeless.

Say the Key Memory Verse together (see above). Post this verse printed on a banner and hung in the room, write it on the white board in the room, or have it on slips of paper that each child can take home.

Pray! Ask the children if they have any prayer requests. Thank God for being with us in difficult situations.


Originally posted by member Catherine, 2003
from Kirk of Kildaire Presbyterian Church, Cary, NC

This is part of the Kirk of Kildaire's Faith Quest Rotation lessons

A representative of Rotation.org reformatted this post to improve readability.

Attachments

Images (1)
  • D&Gart2
Last edited by Luanne Payne

King David

Art Workshop Project


Summary of Lesson Activities: 

Students will make a two-sided cardboard cut out of their face. One side is a self-portrait as they see themselves, the other side is the portrait God wants to see.


Scripture Reference:

1 Samuel 16:1-13, which is the focus of this activity.


Memory verse:

 “For the Lord does not see as mortals see; they look on the 

outward appearance, but the Lord looks on the heart.” 1 Samuel 16:7


Supplies List: 

  • White cardboard paper – 12 x 18, one for each child
  • Black (or any dark color) const. paper – 12 x 18, one for each child
  • Pencils, markers, crayons, colored pencils
  • Hand held mirrors, one for each child
  • Small mirrors (one for each child)
  • Glue or glue sticks
  • Fabric, ribbon, yarn, buttons (optional)

Leader Preparation:

  • Read the scripture ahead of time.
  • Gather the materials.


Presentation


Opening-Welcome and Lesson Introductions:

Greet the children and introduce yourself.


Open with a prayer.


Dig-Main Content and Reflection:

Activity: Lead a short discussion about the reading from 1 Samuel, stressing that:

  • People often look at other people and judge by outward appearances, but God looks inside our hearts to see our inner beauty and goodness. (Outside appearances don’t matter; it’s what’s on the inside that is important.)
  • Even though David was the youngest of the seven brothers, God saw something good inside him and chose him to be the new king of Israel. (You are never too small or too young to be included in God’s plan.)


Have the children draw self-portraits, using the handheld mirrors to see themselves. They may use any of the drawing materials, but might want to draw in pencil first. 

  • Should have a couple of these made up ahead of time as examples. Do not be exact – should be kid friendly. Make sure, however, to have outward features such as freckles, braces, glasses, etc.


Cut out the face, and turn it over.


Now have them draw on the OTHER SIDE of the cardboard face.


On this side they should put symbols for the kind of person GOD wants them to be.


After the drawing is complete, cut around it to make an interesting shape (oval, heart, diamond, etc.). Glue onto black paper. Glue the small mirror onto the picture where their heart would be. Decorate, if desired, using the fabric, ribbon, buttons, etc.


Attach a string to the top of the cardboard head so that it can be suspended and both sides can be seen.

Display the finished portraits from the ceiling of the hallway for all to see.


Add the Memory Verse as a Caption: “For the Lord does not see as mortals see; they look on the outward appearance, but the Lord looks on the heart.” 1 Samuel 16:7


Closing:


Have the children assist with the cleanup and end with a prayer.


A lesson written by Rachel Haugland from: Elim Lutheran

Randall, IA


A representative of Rotation.org reformatted this post to improve readability.
 

Last edited by Rotation.org Lesson Forma-teer

Add Reply

Post a New Topic
Lesson or Resource
Rotation.org Inc. is a volunteer-run, 100% member supported, 501(c)3 non-profit Sunday School lesson ministry. You are welcome to borrow and adapt content for non-commercial teaching purposes --as long as both the site and author are referenced. Rotation.org Inc reserves the right to manage, move, condense, delete, and otherwise improve all content posted to the site. Read our Terms of Service. Get a free Registered Membership or become a Supporting Member for full access to all site resources.
Rotation.org is rated 5 stars on Google based on 51 reviews. Serving a global community including the United States, Canada, United Kingdom, Australia, New Zealand, S. Africa, and more!
×
×
×
×
Link copied to your clipboard.
×
×