Art Lessons, Ideas, Activities, and Resources for Teaching the Story of Ruth in Sunday School.
Post your ART lessons, ideas, activities, and resources for teaching the Story of Ruth in Sunday School.
Don't forget to check out our Writing Team's "Story of Ruth" Lesson Set. It has a great Art Workshop lesson in it!
Ruth and Naomi
An Art Lesson
Focusing on the "Gleaning" part of Ruth's story
Posted by Carol Hulbert
Summary:
Experience weaving with wheat. Learn some Old Testament customs including treatment of widows, and “gleaning” as a way to help the poor and less fortunate.
Scripture Reference:
Ruth, chapters 1-4
Key Verse:
“Where you go, I will go, and where you stay, I will stay. Your people will be my people, and your God my God.” Ruth 1:16b, c (NIV)
Workshop Objectives — After completing this Rotation, participants will be able to:
- Name that the story is found in the Old Testament.
- For 3rd grade and up: Locate the story. Identify Ruth as a book of history in the Old Testament.
- Re-tell the story of Ruth, Naomi, and Boaz.
- Describe: famine, gleaning, the treatment of foreigners, the care for widows, and define a "kinsman/redeemer."
- Discuss friendship, taking care of our family (especially our larger church family), taking care of others, making a choice to follow God, and the blessings that come to those who are faithful.
Leader Preparation:
- Read the scripture for this lesson.
- Read and reflect on the overview material provided for this lesson.
- Gather the materials.
Supplies List:
- Tub of warm water to soak wheat straw (a wall paper tray works really well)
- Wheat: straws with seed heads attached, approximate 10 per student (see resources at end for a potential source)
- Waxed dental floss
- Scissors
- Paper towel
- Spring-type clothes pins (2 per student)
- Pieces of cardboard (12x12) to mount projects on to dry and take home
- Masking Tape
- Sample completed project
- Book: The Book of Wheat Weaving and Straw Craft (see resources at end of lesson)
- Book: The Story of Ruth, by Maxine Rose Schur (see resources)
Before Start of Class:
- Know how to make a clove hitch (pg 20 in the wheat weaving book) and a 3-Straw Hair braid (pg 28-29).
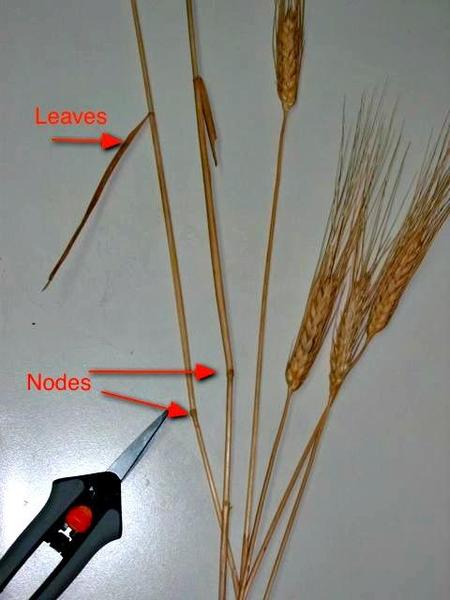 Prepare the wheat prior to soaking by trimming the stalks and removing the “leaves.” Do this in the following manner: From the grain end of the stalk, look down along the stem and find the first node. (Shown in the picture at the right. You can click on the picture to view a larger sized image.)
With a sharp scissors, trim just above this node. Then remove the leaves.
Note: Leaves on a wheat stalk are not obvious! In the picture at the right, I have bent one down to make it look more like a leaf. These leaves will look like they are part of the stem. They are sort of wrapped around the stalk -- thus it is a "leaf sheath" -- or that is what I'm calling it anyway!
Note: Cutting off the stalk may seem like you're loosing something important but don't worry you'll have plenty of stem leftover.- Soak the wheat in hot tap water. Weigh down the wheat to keep it from floating during soaking. I would suggest wrapping the wheat in a towel and then adding water. Be careful not to bend the straws. Change the water as it cools. (Keep the water hot.)
Different kinds of wheat need different amounts of time to soak. The North Dakota Durum we used working out well when soaked 2 and a half hours.
Lesson
Opening:
Greet your students warmly, welcoming them to the Art Workshop. Introduce yourself and any other adults.
Say: Today we will try out a very old art form called wheat weaving. Before we start let’s begin with prayer.
Ask for any prayer requests. Ask if anyone would like to lead the group in prayer. Use the Lord’s Prayer as the ending. [You may ask one or two students to lead the Lord’s Prayer.] A suggestion: “Dear God, Thank you for bringing all of us here today. Be with us now as we learn about your love for us. Help us to see how we can show your love to everyone around us. (End with the Lord’s Prayer) Amen.”
Tell the Story:
Say: One of the best ways to show someone that you care about them is to call them by name and to find out a little bit about them.
Do: Go around the room and have everyone (even Shepherd and yourself) say their name, where they attend school (or what school their kids attend), and what their favorite food is. Allow time for all to respond.
Say: I learned some new things about all of you. We have interests that are (alike or different, depending on how they answered). One thing I know that you all have in common is that you’re a part of a family.
Ask: Did you know that you are also a part of our church family?
Have you ever thought about that, that the people you see at church are your church family – people who love and care about you?
Say: God wants us to show loving kindness to everyone – our families, our church family, our friends, even people we don’t know very well, especially if there is something those people need. We see some examples of that kind of love in our Bible story today. Our story is about a woman named Ruth. She has her own book in the Old Testament, named after her. I wonder what we can learn from Ruth about being a loving family-member?
Do: Distribute Bibles. Using the Table of Contents, have the students find Ruth chapter 1.
Say: The book of Ruth is only four chapters but it’s a little long to read all of it today. I would encourage you to read this book of the Bible at home. In order for us to have an understanding of the story, I’m going to use this picture Bible story to tell the story of Ruth but keep your Bibles open because we’ll refer to them.
Tell the story using the book The Story of Ruth. Show the pictures and use the following words to tell the story:
[Note as the Rotation progresses, show the pictures and ask the students to tell you the story.]
- Page 1 A long, long time ago, there was a famine in Israel. A man named Elimelech (pronounced ee-LIM-ee-lek) lived in Bethlehem with his wife, Naomi, and their two sons.
- Page 2-3 Because there was no food in Bethlehem, Elimelech and his family moved to Moab.
- Page 4-5 They were living comfortably in Moab, but then Elimelech died. This left Naomi as a widow.
- Page 6 -7 Naomi and her two sons were ok for a while. Then the two sons married Moabite women – Orpah (Pronounced OR-puh) and Ruth. They all were ok for a while, and then the two sons died! Now all three women were widows.
- Page 8-9 Now Naomi had heard that the famine was over in Bethlehem. So she made plans to go back. At first her daughters-in-law wanted to go with her to Bethlehem.
- Page 10 Naomi managed to convince Orpah to return to her Moabite family but Ruth had other plans!
Ask the students to turn to Ruth 1:16 in the Bible. Have someone read the verse.
Ask: What questions do you have about Ruth’s choice to go with Naomi? (allow a few replies – point towards this question: why did Ruth choose to go with Naomi, she was choosing to go to a foreign place)
Do you suppose it was hard for widows to survive in those days? (yes, depended on family to take care of them – women couldn’t get jobs)
Say: Let’s see what happened next.
Continue reading the book The Story of Ruth…
- Page 12-13 So Naomi and Ruth went to Bethlehem.
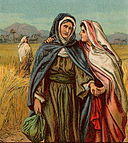
- Page 14-15 Since the barley harvest had just started, Ruth said, “I’ll go and glean barley. If I work hard, I can get us enough to make bread.”
- Make sure the students understand the word “gleaning.”
- Page 16-17 It happened that Ruth was gleaning in a field that belonged to Boaz. Boaz was very kind to Ruth. He offered Ruth water and to join his workers when they ate lunch. He told his workers to watch over Ruth.
Say: Let’s read in the Bible about how Ruth reacted to Boaz’s kindness.
Have them look up Ruth 2:10 and read verses 10-12.
Say: Boaz is showing kindness to Ruth because he has heard about how Ruth has been kind to Naomi. When we show love to others we receive back God’s blessings. One of the examples of loving kindness that we see in our Bible story is that Ruth went gleaning to find food for Ruth and Naomi. Gleaning was hard work. Ruth could have ditched Naomi; could have said, see you later Naomi, and just gathered food for herself! Because Ruth loved Naomi she stuck by her, even when things were tough. That’s showing love!
Do the art project:
Show a dry wheat stalk.
Say: Ruth was gleaning in a barley field when she first met Boaz. What I have here is a different kind of grain – this is Durum wheat – wheat grown for pasta.
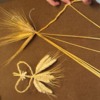
Pass it around so that all can look at it. Show an example of a completed wheat weaving. (See picture below.) Show a few pictures from the wheat-weaving book provided.
Explain that when dried wheat is soaked in hot water it becomes pliable (bendable) and easy to work with. Tell the class that today they are going to make something from wheat that has been soaked and is ready for weaving. This project will remind us of the story of Ruth and Naomi.
Pass out 9 or 10 soaked stalks to everyone. Have them swap with each other so that their stalks are all about equal diameter. Demonstrate how to tie the stalks together (using dental floss) just below their necks, using a c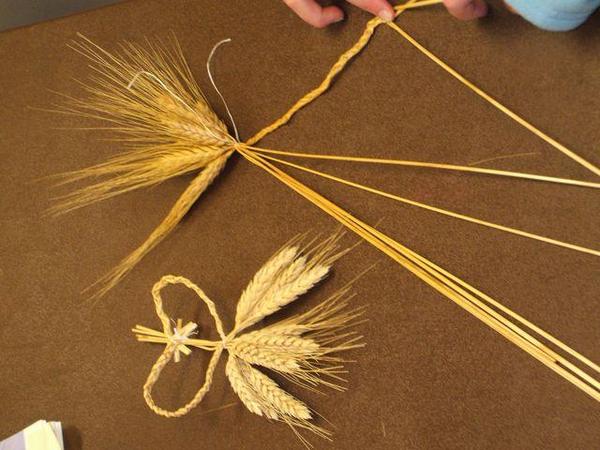 love hitch. (See page 20 in the wheat weaving book). Help everyone get his/her stalks tied together.
In the picture on left, notice the dental floss tied at the "neck." (Click on the picture to see a larger sized image.)
Demonstrate how to do a Three-Straw Hair Braid, braiding the 3 right-most stalks in their tied bundle. Braid them until 6 to 7 inches long. Then hold them temporarily by pinning the braid with a clothespin.
In the picture on the left, the set of 3 right stalks is being braided.
Repeat braiding with left 3 stalks until equal length to other braid.
Tie the 3 (or 4) center stalks 3 inches down from heads.
Form a heart by bringing the ends of the two braids to the center straws at the tie just made. Make sure there are no twists in the braids.
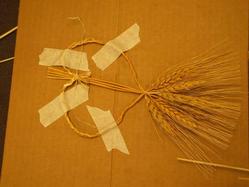
It may help to “pin” the project to a piece of cardboard with masking tape. (Shown on right.)
Remove the clothes pins and tie the braids at the center straws over the tie previously made.
If not done previously, mount the finished project on cardboard with masking tape to dry. Write name on cardboard. (Students may take the project home.)
Discussion: (while the students are working)
- Why was it so unusual for Boaz to be kind to Ruth in this story? (she was from Moab, a pagan land that the Israelites hated, she was a foreigner, he wasn’t required to help foreigners)
- The story of Ruth and Naomi is an example of a friend who gives to someone even when they have nothing to give in return. What examples of this kind of loving friend were in the story? (Naomi couldn’t offer Ruth anything – they were headed to Bethlehem as two poor widows; Boaz kind to Ruth, told his men to treat Ruth well, offered her water from his jars; continued care for Naomi)
- Tell the rest of the story of Ruth. About how Boaz marries Ruth.
- What does God teach us about caring for others from this story? (our differences don’t matter; God wants us to show loving kindness to all)
- Have you ever had a friend like Ruth? (allow all answers)
- How is God a “loyal friend” like Ruth? (loves you no matter what; loves you even when you have nothing to give back)
- Explain the concept of a kinsman-redeemer: What does the word redeem mean? (buy back, reclaim) Who was the Redeemer in the story of Ruth? (Boaz, he married Ruth & saved her from a bad life)
- Boaz and Ruth were blessed with a child. That child would redeem Naomi from her status as the poor widow left alone. Generations later in that family another child would be born. This child (Jesus) would come to redeem as many as would receive him.
Closing:
Say: God loves you and God wants us to show our love to other people. In return you will find that God will richly bless your life.
Resources:
- (updated Jan. 2019) North Dakota Durum wheat - unfortunately our supply source: Black Beards in Turtle Lake, ND has closed; after 35 years, the farmers retired! Reportedly a woman in Flint, MI bought all of their supplies: Melissa Ruboyianes wheatstreet@rocketmail.com; (810)919-6180. I have not tried to contact her but if you find out anything, please post a reply below.
- Owens-Celli, Morgyn Geoffry. The Book of Wheat Weaving and Straw Craft: From Simple Plaits to Exquisite Designs. Asheville, NC: Lark, 1997. Print.
- Schur, Maxine Rose, and Gwen Connelly. The Story of Ruth. Minneapolis: Kar-Ben Publishing, 2005. Print.
A Sunday School lesson written by Carol Hulbert from: First United Methodist Church
120 S. State Street Ann Arbor, MI 48104
Copyright First United Methodist Church, Ann Arbor, MI. Permission to copy materials granted for non-commercial use provided credit is given and all cited references remain with this material.



 1. Wrap your hand and wrist in several layers of aluminum foil and gently scrunch it around your fingers to create a "hand form."
